
Modernise or Update a Chest of Drawers
It doesn't take much to transform an ugly chest of drawers into a modern and stylish piece for a home.
2/06/2023
www.blog.plankhardware.com
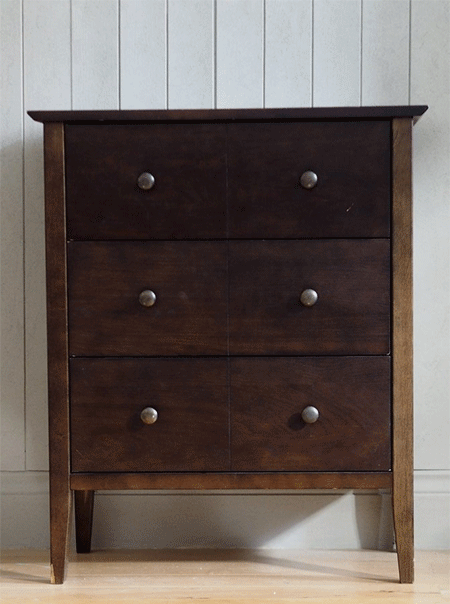
I compiled an article about two weeks ago on 'How to Modernise Plain Pine Furniture'. The idea behind the article was that it is an easy project to transform ordinary pine in so many ways. I think that this article ties in nicely with that and is just another way to show how you can transform a pretty ordinary piece, such as this chest of drawers, using just a bit of effort.
This project from lukearthurwells is a great example of how to use a few supplies that you can buy at your local Builders to update an old-fashioned or just plain ugly piece of furniture and turn it into an eye-catching accent for your home. Below you will find a list of what you need for this project as well as step-by-step instructions for turning any piece of furniture into something special, something that you did all on your own.
YOU WILL NEED:
Piece of furniture to work on
9mm SupaWood [MDF]
Wood filler and putty knife
Wood glue
Chalk paint
Top sealer for chalk paint, ModPodge or clear acrylic sealer
Paintbrush, paint roller and paint tray
Decorative knobs, pulls, or handles
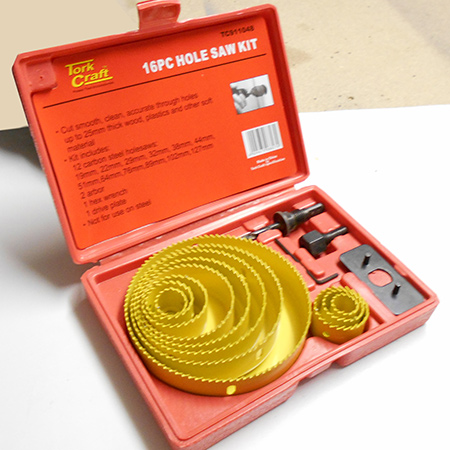
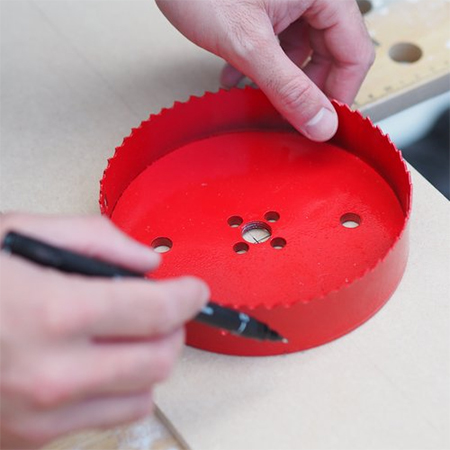
Tork Craft supply a wide selection of tools and accessores such as this Hole Saw, for all fields of industry, including affordable accessories for DIY enthusiasts and woodworkers. Purchase the Tork Craft 13-piece Carbon Holesaw Kit at Builders on special at R199 until end of July 2023.
Find detailed instructions on how to use a hole saw here.
TOOLS:
Drill plus assorted bits
100mm hole saw
Orbital sander plus 120- and 240-grit sanding pads
Jigsaw plus clean-cut jigsaw blade (small or fine teeth)
Quick clamps
Tape measure and pencil
Safety gear
HERE'S HOW:
Step 1 - Preparation
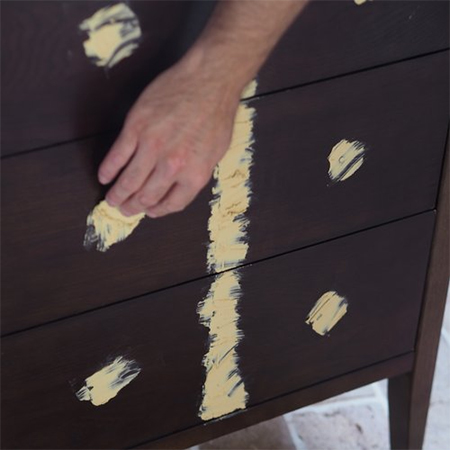
The first step is to remove all the hardware such as knobs and handles. Don't throw these away, you never know when you might need them. Use wood filler to fill all the holes left by the hardware. You can also use wood filler if there are any cracks that are visible. Leave the wood filler to dry overnight.
DIY TIP
Don't apply too much wood filler as it takes longer to dry and more work to sand away. Apply just enough wood filler to fill the holes and use a putty knife to scrape off any excess.
The next step is to sand the piece lightly. You don't need to perform much sanding if you are applying chalk paint - just enough to remove the gloss of the varnish. At this stage, you can also sand the areas treated with wood filler. Go over the piece once with 120-grit sanding pads and then with 240-grit sanding pads for a silky-smooth finish. Use a cloth to remove all the dust.
DIY TIP
An orbital sander will do the just much faster than hand sanding but if you don't have a sander, use a fine and medium sanding sponge.
Step 2 - Cutting the Drawer Faces
Use a tape measure to measure the length and height of the drawer fronts for the drawer faces. Double-check that all the drawers are exactly the same size or, if not, remember this when cutting for the drawer fronts. Use a jigsaw to cut the drawer faces to size. Sand the cut edges smooth.
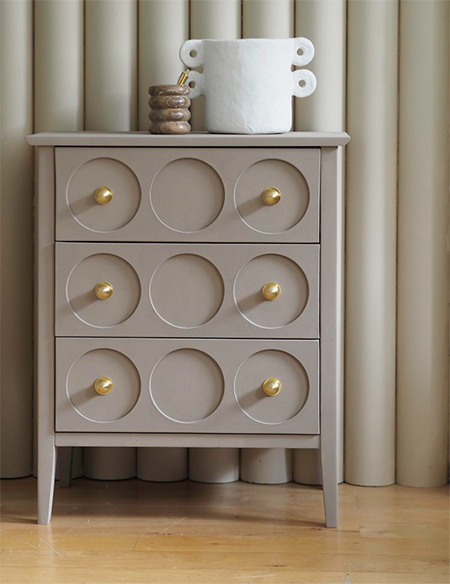
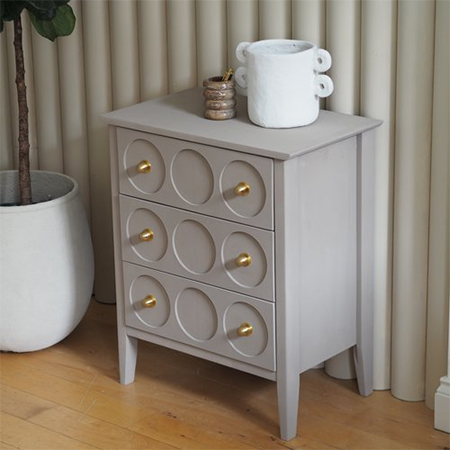
In this project, each drawer front has three circular cut-outs, this might change depending on the length of your drawers. If they are longer, you may need to have more than three cut-outs and you will need to work out the spacing between, taking into consideration that the circular cut-outs are 100mm in diameter. Measure and mark the centre of both the horizontal and vertical planes and draw a straight line to make it easier to work out and repeat the vertical lines so that each circle is bisected to make it easier to drill accurate circles with the hole saw.
DIY TIP
Take the total length of each drawer front. Determine the centre and mark for both horizontal and vertical. Keeping in mind that the holes are 100mm in diameter, calculate the position of the three or more circles.
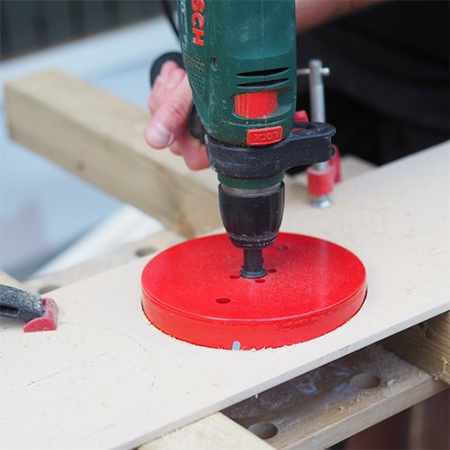
Step 3 - Cut the Circles
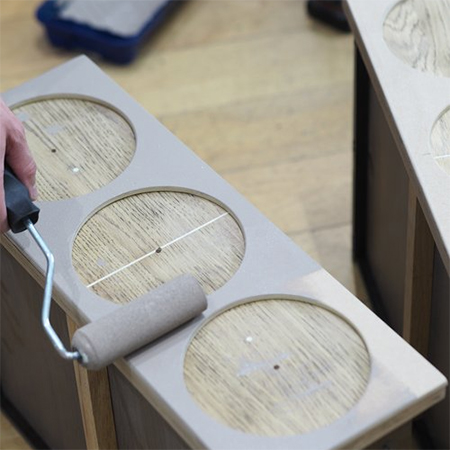
Use a 100mm hole saw to cut the circular cut-outs. Clamp the drawer faces firmly on your workbench, allowing space underneath where the holes will be drilled. Use the horizontal and vertical marks to position the bit of the hole saw in the centre point and cut out the circles, repeating this process for all the holes and drawer faces. Sand the cut edges smooth with 120-grit sandpaper
DIY TIP
Once the circles are cut out, put these aside for use in the next step.
Step 4 - Attaching the Drawer Faces
Apply a layer of wood glue to the back of each drawer face and press this onto the drawer front. Immediately wipe away any excess wood glue that oozes out.

DIY TIP
When working with drawers, it is always a good idea to mark which drawers go where so that they are fitted in the correct position.

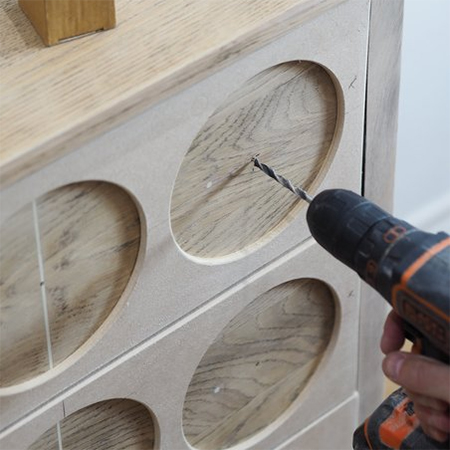
Step 5 - Drill Holes for Knobs or Pulls
Take the circular cut-outs that you put aside earlier and use these to mark the centre of each circular cut-out.

Now you have a mark where to drill the holes for fitting new knobs or pulls.
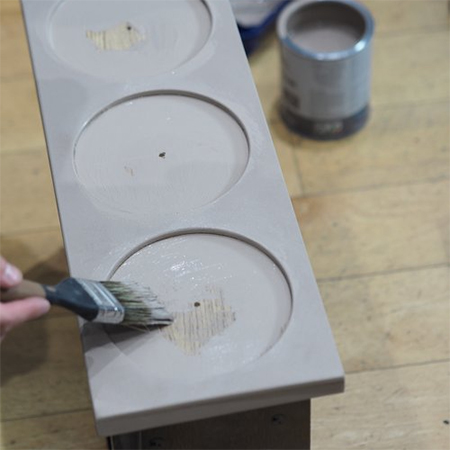
Step 6 - Painting
Chalk paint is a fast way to paint any piece of furniture and far less work. Use a paint roller to go over the flat surfaces and a paintbrush to paint inside the circles and around the edges. Apply two coats and allow drying time between coats. Once the chalk paint is dry, apply a coat of top coat sealer, ModPodge, or clear acrylic sealer to protect the finish.
DIY TIP
Do not overload the paint roller or paintbrush as this will leave behind thick globules of paint that will spoil the finished result. Wipe any excess paint away with the paintbrush or roller.
Step 7 - Install Hardware
Finish off your updated chest of drawers by installing new handles or pulls, using the pre-drilled holes in the centre of each circular design.