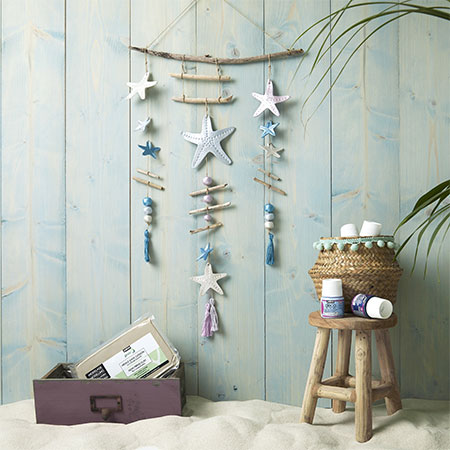
Bring Keepsakes Back From Your Holidays to Make This Starfish Mobile Wall Hanger
Collect driftwood from the beach on your next holiday to make this decorative starfish wall hanger.
20/10/2023
pebeo.com
If you plan on going to the coast for your next vacation, there are a few items you might like to collect when strolling along the beach. Even the kids can get involved as there are some craft projects that they will enjoy. Make it a family day to stroll along the beachfront just after high tide to collect driftwood, pretty shells for crafts with seashells and sand-smoothed pebbles for the kids to paint with wonderful designs or for mom to use in crafty ways.
Air-dry clay is so easy to work with and there are so many ways you can use this versatile clay product. Unlike traditional clay that has to be fired in a hot kiln, air-dry clay is left to dry in a cool spot. Depending on the thickness of the clay and design of the project you are making, it only takes between 24 and 48 hours for air-dry clay to cure, as long as it is in a cool spot. You can also place the clay project outside in the sun but early morning and late afternoon sun is preferable or the clay may dry too fast and cracks appear.
If you visit our Craft section, you will find that we have plenty of projects that use air-dry clay such as pretty bud vases, decorative clay bowls or plates, how to make pretty clay vases, and even Christmas decorations made with air-dry clay.
YOU WILL NEED:
Air-dry clay
Rolling pin
Thin skewers, 2
Craft or utility knife
Plain white paper, pencil and scissors
Tassels, or make your own using embroidery thread
Thin cotton twine or string
Ultra-thin wire
Driftwood or wood branches
Metallic craft paint and paintbrush
HERE'S HOW:
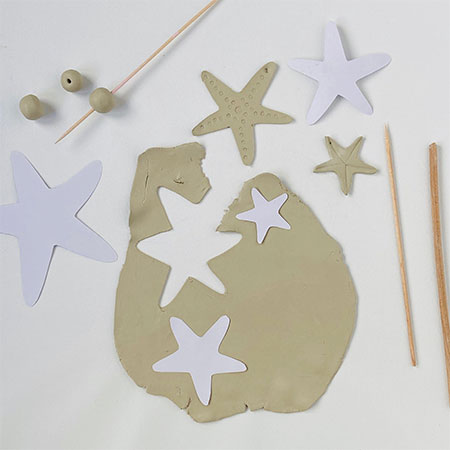
Step 1 - Roll out the air-dry clay
The first step is to break off a piece of clay and roll this perfectly flat. Placing a couple of wood skewers along the sides allows you to run the rolling pin over the top of the clay and have a perfectly level surface from start to finish.
GOOD TO KNOW
You do not need to roll out the clay for all the components, just keep in mind that the clay starts to air-dry as soon as it leaves the protective packet, so work as quickly as possible.

Step 2 - Cut out various starfish shapes
Find a suitable star shape online that you can print out or draw freehand. Draw a small and large shape and cut these out with scissors.
Step 3 - Transfer the shapes
Use the small and large starfish templates to cut out the shapes in the roller clay using a craft or utility knife. You can use the leftover clay to roll the bead shapes that also form part of the wall-hanging design. Use a wood skewer to poke holes at the top of each starfish shape and in the beads.
DIY TIP
Use something to add designs to the surface of the clay while still wet. This can be the top of a pen or pencil, or anything else that you can use to press into the clay.
Step 4 - Allow time to harden
Put all the prepared pieces aside in a cool place and leave them for 24 hours. Turn them over to check that the clay is a consistent light colour and the surface is hard. If not, leave them for an additional 24 hours with the wet side facing up.
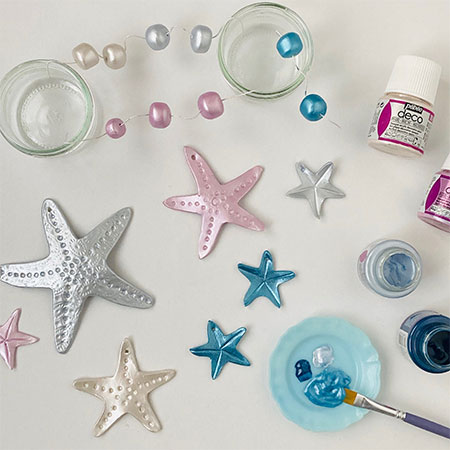
Step 5 - Painting the components
You will need to apply at least 2 coats of paint on each side for complete coverage, allowing sufficient drying time between each coat. Paint the front and then the back of the starfish shapes and, to make it easier, thread the thin wire through the beads and hang these over a couple of tumblers while the paint dries.
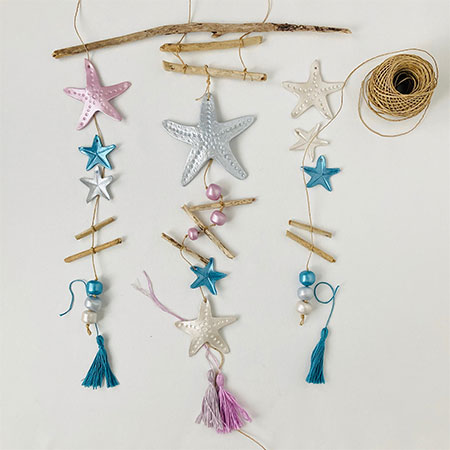
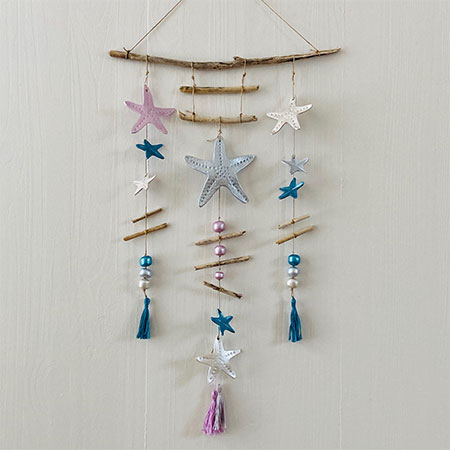
Step 6 - Assembling the wall hanger
Now it is time to assemble the wall hanger by threading the cotton thread through the starfish and through the beads until you complete each hanging length, leaving enough at the bottom to add tassels. The tops of these are then fastened to odd lengths of driftwood or branches. Make the two end lengths longer to make a hanger to mount the wall hanging on a hook on the wall.