Make Air-Dry Clay Bowls or Plates
Use air-dry clay to make a selection of handcrafted bowls that are wonderful for gifts for any occasion - or for Valentine's Day.
10/2023

metzpress.co.za/books/book-details/vintage-remakes/
Making your own air-dry clay bowls is an
affordable way to handcraft unique gifts for any
occasion. Carla Visser
shows us how to make a selection of clay bowls
that can be used as a keepsake or trinket
holder, a wedding ring holder, or for a
decorative accent.
Follow the instructions below to make a
wedding ring bowl, or add your own touches for a
decorative bowl for any occasion.
YOU WILL NEED:
Air-dry clay, white
Small and medium bowls
Craft knife
Granite or plastic rolling pin
Lace doilies
Wooden skewer
Cling wrap
Assorted shapes and / or letters
120-grit sandpaper
Gold craft paint and brush, or gold leaf and size
HERE'S HOW:
GOOD TO KNOW
Work on a glass tray or non-stick surface.
1. Break off half the air-dry clay and roll
into a ball before rolling flat with a rolling
pin. Flip over a few times to get a
smooth finish on both sides and aim for a thickness
of about 3mm.
2. Place the medium bowl gently over the
top of the rolled clay and use this as a guide to cut
around the clay with your knife.
3. Position the doilie on top of the clay and
firmly press it into the clay by rolling over it
with your rolling pin. You want to impress the
pattern from the doilie onto the surface of the
clay without spoiling the shape too much. Lift
off the doilie.
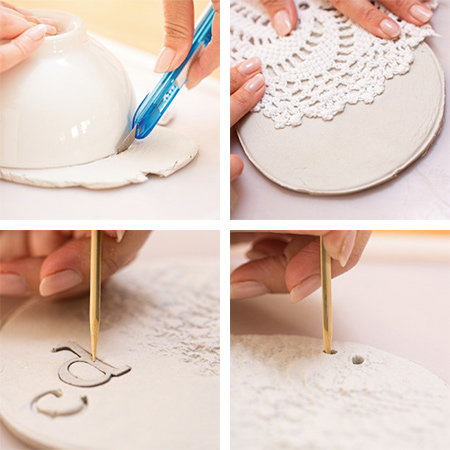
4. Press your letters and / or shapes into the clay gently with your fingers. Carefully remove the shapes - using the skewer to help you.
GOOD TO KNOW
Use the tip of a skewer to press on the smaller parts of the shapes to ensure a perfect transfer.
5. With the end of a skewer create two holes
close to the edge of the clay. Once finished, you will thread
the ribbon that will hold the rings through
these two holes.
6. Cover the inside of your small bowl with
cling wrap and then carefully lift the clay and
put it into the bottom of the bowl. Use your
fingers to push it down gently, without marking
or denting the clay. Leave to dry for at least
24 hours before removing the clay from the bowl
7. Lightly sand the bowl with
sandpaper if necessary.
8. To finish the bowl you can apply metallic
gold craft paint, or use gold leaf and size to
add decorative touches.
Vintage Remakes by Carla Visser, Metz Press