
DIY gutter installation
Gutters are most often installed by professionals, but there’s no reason you can’t do it yourself.
All the materials and accessories are readily available at Builders Warehouse to install your own gutters and downspouts. And if you’re going to replace your gutters and downspouts, you may as well upgrade the entire look and performance of the rainwater system.

For homes in most regions of the country, rain gutters and downspouts are necessary to collect and carry away rainwater. Without them, water would erode the soil around the foundation and splash dirt onto walls.
We show how to install half-round gutters. This system features corrugated downspouts and decorative cast-aluminum brackets.
NOTE: To ensure that gutters drain properly, make certain they slope (2mm for every 3 metres) toward a downspout. For gutter runs longer than 5 metres, it’s best to pitch the gutter down from the middle to a downspout at each end. Or you can slope the gutters down from each end toward a single downspout placed in the middle of the run. Determine what works best for your house before ordering gutters and attachments.
1. Snap layout lines
Mark the highest point of the gutter run on the fascia 5cm below roof tiles. At the other end of the fascia (or at the downspout location if there's one in the middle of the run), mark the low end of the gutter run, keeping in mind that the slope should be approximately 2mm for every 3 metres of run. Snap a chalk line between the two points (shown above). Tip: Check the fascia for rot - and make repairs if necessary - before installing the gutters.
2. Attach fascia brackets
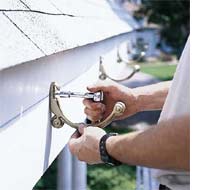
Locate the rafter tails behind the fascia. Make a mark at the chalk line on every other rafter tail.
Drill a 2mm-diameter pilot hole through the fascia and into the rafter tail at each mark.
Fasten fascia brackets with stainless steel lag screws long enough to penetrate rafters 5cm.
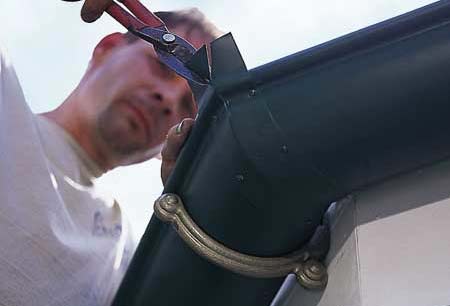
3. Saw gutter to length
Cut gutter section to length with hacksaw and tin snips, or with a power mitre saw fitted with a carbide-tipped finish blade. If the gutter continues around a corner, cut the appropriate angle (typically 45 degrees) on that end. If the run requires two sections of gutter, overlap them by 150-200mm and use pop rivets, in two rows of four each, to join them. Tip: Locate screws or rivets in the sides of the gutter, never in the bottom.
4. Attach end caps

At the square-cut end of the gutter, attach a spherical end cap with aluminum pop rivets. (If the gutter doesn't turn a corner, fasten an end cap to each end.)
To do this, hold the end cap in place temporarily with a single sheet-metal screw, then drill a 2mm-diameter hole and install one pop rivet.
Remove the temporary screw and replace it with a rivet.
To ensure a watertight joint, seal the rivets and the end-cap seam on the inside of the gutter with a high-quality exterior-grade silicone sealer.
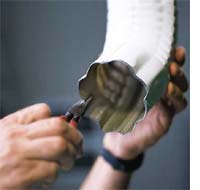
5. Cut downspout holes
Use a downspout outlet to mark the location of the downspout on the low end of the gutter.
To do this, turn the gutter upside down and place the outlet on top.
Trace around the inside of the outlet to mark the downspout hole on the gutter.
Drill a 2mm-diameter hole through the centre of the circular outline.
Turn the gutter over and cut the downspout hole using a hole saw chucked into a drill.
6. Install gutter
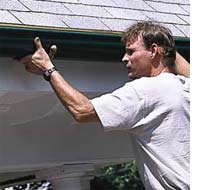
Lay the gutter into the brackets that you've lag-screwed to the fascia.
Rotate the gutter upward until its back edge slips into the hooks at the top of the back of the brackets.
Through the screw-mounting hole in each bracket, drill a hole in the front edge of the gutter.
Secure the gutter to the bracket with a stainless steel machine screw and flanged nut.
Tip: Aluminum gutters and brackets can be spray-painted to match - or contrast with - the house trim.
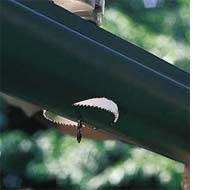
7. Form strip-mitre joint at corner
Cover the joint between two lengths of gutter at each corner with a strip mitre - a strip of aluminum.
Wrap the aluminum strip tight around the underside of the gutter. Secure it with eight pop rivets or sheet- metal screws.
Cut a triangular section from the top of the strip mitre (as shown above) with snips, and then fold down the two flaps around the top edge of the gutter.
This joint can also be made more waterproof with the addition of a high-quality exterior silicone sealer.
8. Connect downspout to gutter
Secure the downspout outlet to the gutter with four pop rivets or screws.
Screw a downspout elbow to the outlet tube protruding down from the gutter.
Hold another elbow against the house and cut a piece of downspout to fit between the two elbows.
Use needle nosed pliers to slightly crimp the elbow to fit into the downspout (as shown).
Fasten the parts together with pop rivets or screws.
DIY Tip:
Use two downspout brackets on a one-storey house and three brackets on a two-storey house.