
Carpentry and Woodworking
When undertaking woodworking projects you will encounter the different methods of jointing. Get to know these methods and how the different joints are applied in do-it-yourself projects.
01/04/2021
Mitre joints

A mitre joint is used at corners to hide the end grain and so that a moulded shape continues around a corner. To create a mitre, the angle at which two surfaces meet is bisected. In a true mitre this is 90 degrees and so each surface is cut to 45 degrees, but the angle may be obtuse or acute. Mitre joints constructed using materials of different thicknesses are known as 'offset' or 'bastard' mitres.
When undertaking woodworking projects, you will encouter the different methods of jointing. Get to know these methods and how the different joints are applied in do-it-yourself projects.
HERE'S HOW:
1. Set out the length of the material, keeping in mind that if the mitre is inside a corner, the length is measured on the long face of the mitre. If the mitre is on the outside of a corner, the length is measured on the short face but allow for the thickness of the joint.
2. Once the length has been determined, mark a 45 degree line on the edge or face where the angle is to be cut.
3. Using a combination square, square a line across each side of the timber.
4. To cut the timber by hand, use a mitre box (if available) with a fine toothed saw such as a tenon, panel or mitre saw. Hold the work firmly against the back of the mitre box when cutting: if it slips it will result in an uneven cut and a poorly fitting joint. If cutting freehand, take care to follow the set-out lines on all sides of the work. If you have one, a power mitre saw will provide a very accurate cut.
5. Place the two pieces together and check the fit. You may be able to adjust it by planing the surface of the mitre. Hold the work firmly and use a fine set, sharp plane.
6. If the joint is to be nailed, start the nails in both pieces by laying them flat and nailing through the external face until the point just comes through the mitred face.
7. Apply adhesive and hold the joint firmly, with one side slightly overlapping the other. Drive the nails in the overlapping side first. As the nails are driven in, the weight of the hammer will cause the joint to slip. When the nails are driven home, the surfaces should line up. Nail the other side and punch the nails. Check for square.
8. If you have a small gap because your mitre doesn't quite line up, rub over the open corner of the joint from both sides with the round shaft of a screwdriver. This will push the fibres over on the outside and perhaps hide the gap. If the gap is too wide, however, you may have to recut the joint, or you can fill it with a putty.
9. To add strength to a mitre joint, you may glue a block on the inside as long as it is not seen. If appearance is important, a loose tongue placed inside the joint or veneer keys across the joint will give extra strength. On flat mitres, dowels or tongues may be placed inside the joint.
Butt Joints
The butt joint is the simplest of all joints. They can be used in boxes, widening or framing construction.
HERE'S HOW:
1. Cut the ends of the two pieces square and place them together.
2. Fix with screws or nails.
3. Adhesive is usually applied to the joint before fixing to increase its strength.
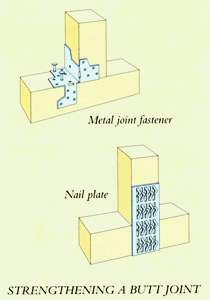
Butt joints in framing may also be strengthened by fixing a nail plate or corrugated fastener over the outside, or a timber block may be fixed to the inside.
Dowel Joints
Dowel joints are constructed using dowel pins or rods to connect two pieces together
HERE'S HOW:
1. Accurately cut all components to size. Set out the position of the rail on the face side and edge of the stiles.
2. Mark the centre lines for the dowels at the ends of the rails. This must be at least half the thickness of the material in from each edge. For wide rails, more than two dowels may be required.
3. Lay the stiles and rail face side up on a flat surface, in their correct location. Using a try square, transfer the centre lines onto the stile. Number and mark each joint.
4. Square these marks across the face edge of the stiles and ends of the rails.
5. From the face side, gauge a line across the centre of the timber to cross the set-out lines. This represents the centre of the dowel holes.
6.Using a power drill with a twist bit attached, or a hand drill with an auger bit attached, drill the holes straight in all the pieces. Make sure the drill bit has a long centre point and clean cutting spurs. When drilling into cross grain the depth of the holes should be about two and a half times the diameter of the dowel and in end grain three times the diameter. Leave approximately 2 mm clearance at the bottom of each hole.
7. Countersink the top of the dowel hole to remove any fibres. This also helps when inserting the dowel and provides an adhesive pocket for greater strength.
Dowels
Dowels should have a groove down the side to allow any extra adhesive to escape when the joint is assembled. If the dowels do not have a groove, plane one side flat to achieve the same result. The ends should be tapered (chamfered) to permit easier assembly and prevent the dowel tearing the inside of the hole. Again, if the dowels are not tapered, file or sand them to a tapered shape.
Using dowel centres
Set out and drill the rails of the joint. Place dowel centres in the dowel holes. Line the rail up with the set-out lines on the stile and push together. The points on the centres will mark the position on the stile. Drill on these marks. An alternative way of locating the centres is to drill holes in a guide block and clamp it in place as a guide when drilling.