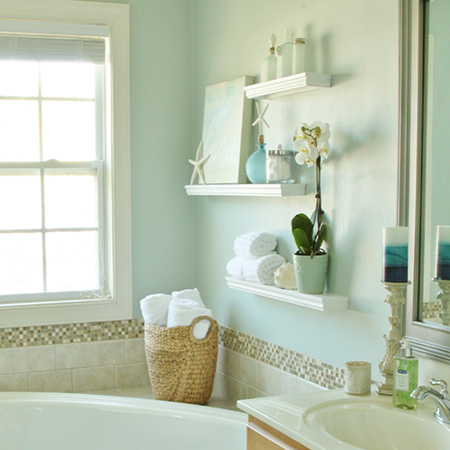
Easy floating shelves for a bathroom
Make these simple decorative floating shelves for a bathroom and create an instant feature. You can use the shelves for storage or to add decor accessories.
homedepot.com
I found this easy shelf project on the Home Depot website, but since most of the materials are not available locally, I made a few modifications for supplies that you can obtain at your local Builders store, so that you too can add decorative shelves to a fill up a bare bathroom wall and add extra storage.
The most important step to bear in mind when mounting shelves onto a wall, or on top of tiles, is to use an Electronic Detector before you do any drilling to mount the shelves. You never know what might be in the wall, and an Electronic Detector will give you the green light if it is safe to proceed.
YOU WILL NEED:
32 x 32mm lengths of PAR pine
Half sheet of 3mm white Masonite
Extruded polystyrene moulding
Pattex No More Nails adhesive
Long panel pins and hammer if you don't have a pneumatic nailer
Nylon wall plugs and screws for fixing to wall
Masking tape
TOOLS:
Combi Drill or Impact Drill and accessories
Spirit level
Electronic Detector
Mitre saw or mitre box and backsaw
Tape measure and pencil
HERE'S HOW:
Preparation
Use a spirit level, tape measure, pencil and masking tape to mark the location for your shelves. Go over the area first with an Electronic Detector to ensure it is safe to drill where you want the shelves to be, or make any necessary adjustments.
Assemble the shelves
The shelves are made using a 3mm white Masonite top and bottom glued onto a 32 x 32mm pine frame. The pine frame is glued and screwed together - the top and bottom are glued onto this with Pattex No More Nails adhesive.
Leave one long length of batten free, as this is the part that will be mounted onto the wall to support the shelf.
You can make the shelf any length, but for longer lengths add a centre batten to support the top. The width of the shelf should be no more than 200mm wide. This width, including the width of the polystyrene trim, will add plenty of shelf space.
Cut the extruded (rigid) polystyrene moulding to fit the box shelf. The corners are cut at opposing 45-degree angles and this can be done with a mitre saw or a mitre box and backsaw. Do a practice run cutting a couple of small offcuts before you start the main project.
To mount the polystyrene moulding onto the box shelf use a combination of pins and adhesive. If you don't have a pneumatic nailer you can use a hammer and long panel pins. Only use adhesive (Pattex No More Nails) that is suitable for use with polystyrene. Many solvent-based adhesives will dissolve polystyrene, so check the package to ensure the adhesive can be used on polystyrene.
Give the completed shelves a coat or two of Prominent Paints Select Sheen. This will cover up any pin heads and also disguise the joins.
Since the shelves are light and are not designed to support heavy weight, use fischer SX8 nylon wall plugs. The screws should be the length of the plug (40mm), plus an extra 5mm, plus the width of the pine (32mm) with countersunk pilot hole = 75mm.
Once the battens are mounted onto the wall, slip the box shelf onto this and secure onto the batten with panel pins through the top of the shelf. Cover up the pin heads with a touch of paint.


