The Easy Way to Mount and Install Curtains
If you have never installed a curtain rail, or hung curtains before, here's an easy way to do it - a method for all those mathematically-challenged decorators!
02/09/2019
This article is intended for anyone who has never before installed a curtain track or curtain rail, nor hung their own curtains. I am featuring this article on behalf of all us mathematically-challenged decorators who find it difficult to make sense of the instructions out there for doing this job.
Having owned quite a few different homes over the years, I still find it a mission to get my curtains to be the perfect length. While you can blame it on some of the curtain manufacturers out there, since the curtains never seem to be the exact length they are supposed to, or the fact that the curtain track or rail isn't set at the right height.
Whatever the case, in this article I am installing the curtain track to the perfect height for my new curtains and to make sure they don't fall in a big puddle on the floor or leave a huge gap between the floor and the bottom of the curtain.
You would think that installing curtain track and hanging curtains would be easy... right? Well, if you have never done this before it can be quite confusing. How high should the curtain rail be, what length do you buy the curtains, and so on. If you have never installed a curtain track or bought and hung your own curtains before, here's an easy way to do it right the first time.
First off, pop into your nearest Builders Warehouse and head for Finishing Touches inside the store. In this section you will find all the hardware and accessories you need to hang your new curtains.
YOU WILL NEED:
Curtain track, single or double, depending on what you need to hang
Extra runners, if you want a more ruffled look
Curtain hooks
Ready made curtains (or have made to measure at Finishing Touches)
TOOLS:
Drill/Driver plus assorted bits
Spirit level
Tape measure and pencil
Jigsaw (if you need to cut the track to length)
To drill into hard brick or a concrete lintel you need a Bosch Combi Drill with hammer function and Alpen Masonry Drill Bits.
HERE'S HOW:
1. When buying the curtain track, these come in standard sizes. My sliding door, allowing for the curtain drops on either side, is 2200mm long and the standard track is 2500mm. That means I need to trim a bit off one end of the track for it to fit the space. You can easily do this using your jigsaw and a steel-cutting blade, Dremel DSM20, or Dremel MultiTool and cutting disk.
GOOD TO KNOW: Remove the end cap on the curtain track and put this back in place once you have cut to length.
2. Now you can set and adjust the brackets that will hold the curtain rail on the wall. They supplied [4] brackets with the rail but I only really need the three, since I'm only hanging two lightweight curtains.
3. Most ready-made curtains (unless otherwise specified) are fitted with a tape at the top of the curtain. This tape has 3 levels (top - middle - bottom) where you can place the curtain hooks. I like to place a curtain hook ever 4 spaces for a nice gathered effect, but you can quite easily adjust this for less or more gathering.
GOOD TO KNOW: Now this is where it can get tricky if your track is already up. The curtain measures 218mm total length and you have to measure from the hangers (on the curtain track) to the floor, and with this measurement, you can decide in which level you need to insert the curtain hooks.
4. At the end of the curtain tape are pull cords. These are to gather the curtains and give them a nice drop once they are hung on the rail.
GOOD TO KNOW: It is important to note that for curtains on the left of a window - adjust the pull cords on the left side of the curtain - and vice-versa for the other side. That way, you won't have any pull cords dangling down where they will be visible.
www.venetablinds.com.au
Where to install the curtain track?
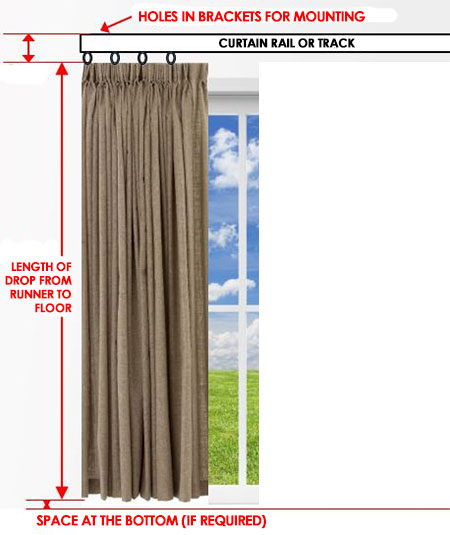
5. Having taken a tape measure and measured from the middle row on the tape (at the back of the curtain) to the floor, I now know the measurement for drilling holes to mount the curtain track brackets. Holes were drilled for the centre bracket on the curtain track.
GOOD TO KNOW: Don't forget to include the distance from the runner to the location of the holes in the brackets - see diagram above.
GOOD TO KNOW: The plastic wall plugs that came with the curtain track were replaced by nylon wall plugs. I've often talked about the difference between plastic and nylon wall plugs and why you should use the latter.
GOOD TO KNOW: Tape the wall plug with a hammer, if necessary, so that it is flush with the wall.
6. The middle bracket was mounted first by driving a screw into the wall plug, and the remaining ends of the curtain track were checked for level and then also secured in place with the end brackets.
Hanging the rail to allow for the length of the curtains lets me install my curtains at the perfect height and not have a huge puddle of fabric on the floor.


