
How To Build An Outdoor Bar - Even For A Small Garden
South Africans have an affinity for spending their free time outdoors and building an outdoor bar is just one of the ways to enjoy your garden even more.
25/07/2023
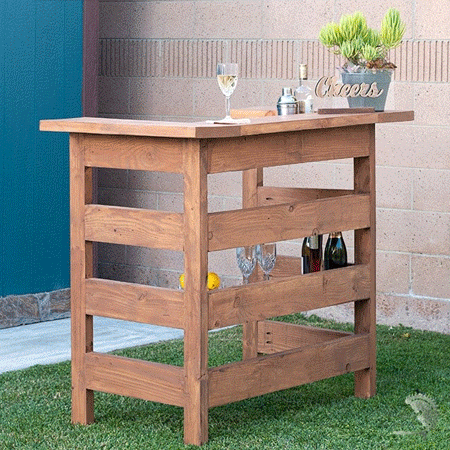
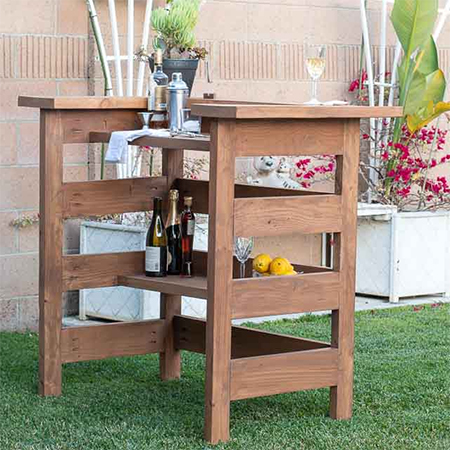
With our beautiful climate and an affinity for spending as much time as possible outdoors, the idea of building an outdoor bar to complement your entertainment area, patio, or deck, is a worthwhile investment that will not only enhance your current lifestyle but also add value to your property. Whether your garden is small or large, there are plenty of outdoor bar designs that are reasonably affordable to build and can be adapted to fit into any space, especially if you are doing it yourself.
How to build and outdoor bar
The nice thing about building your own outdoor bar is that you get to select the materials for the bar and you also get to decide on how it looks and the size it needs to be to fit into a particular area in your outdoor space. The DIY outdoor bar below might have a simple design but it is a great beginner project for anyone wanting to learn how to use a Kreg Pocket hole Jig to assemble various projects.
Being able to choose what materials you need to build this outdoor bar gives you freedom to select what you can and cannot afford, for example, if you used PAR pine for this project, it would work out far cheaper than using teak or exotic hardwood.
This outdoor bar was designed and made by anikasdiylife.com and she has plenty of great projects on her website. I have modified this design slightly to allow for locally sourced material sizes and metric measurements. For anyone still working with imperial measurements, you will find detailed step-by-step plans here.
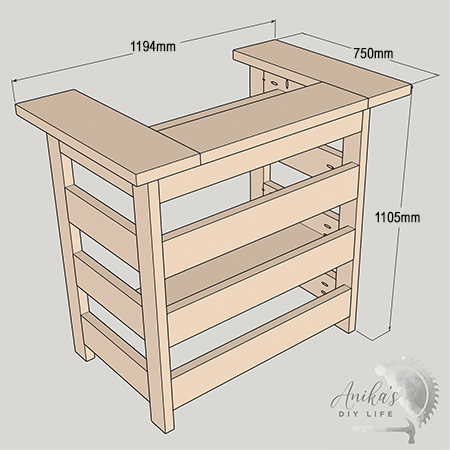
Note that I modified the original measurements to allow for 38 x 228 x 6600mm untreated pine. This is not PAR pine as it isn't Planed All Round but that makes it a far cheaper solution for this type of outdoor project.
YOU WILL NEED:
3 of SA Pine Untreated (38 x 228mm x 6600mm) cut as per cutting list below
2 of SA PAR Pine (44 x 44 x 2400mm) cut as per cutting list below
32mm coarse thread pocket hole screws
Wood glue, waterproof
Quality exterior sealer and paintbrushes
CUTTING LIST:
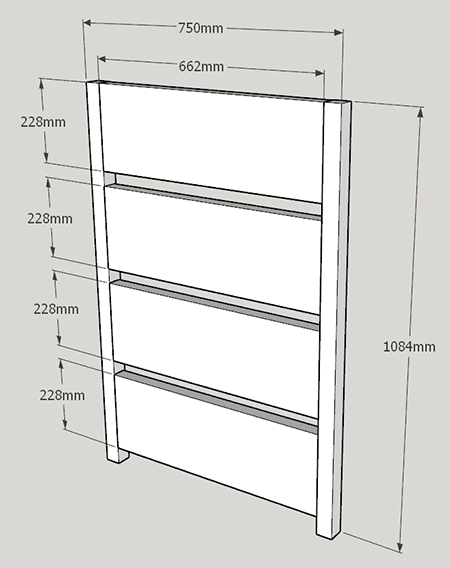
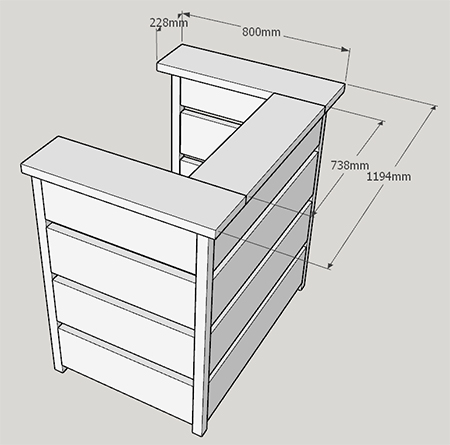
8 of 21 x 228 x 662mm - side panels
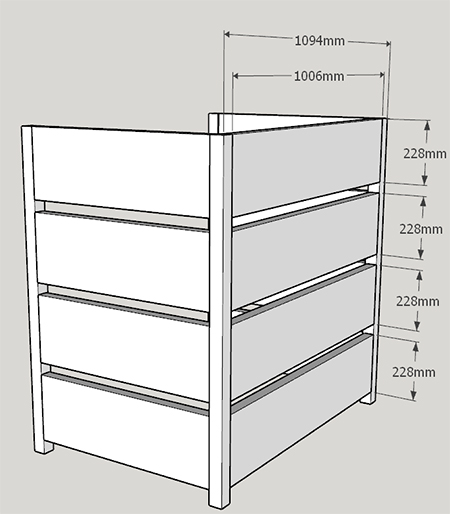
4 of 21 x 228 x 1006mm - front panels
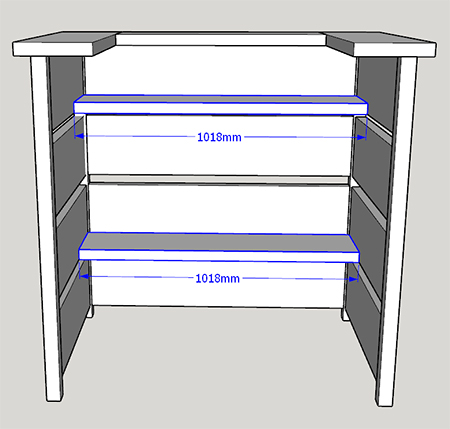
2 of 21 x 228 x 1018mm - shelves
2 of 21 x 228 x 800mm - bar top, sides
1 of 21 x 228 x 738mm - bar top, front
4 of 44 x 44 x 1084mm - legs
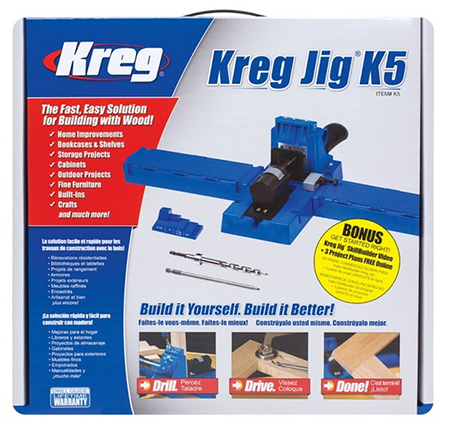
Purchase the Kreg Jig K5 Master Pocket Hole System at Builders for R3,199 each while stocks last
TOOLS:
Drill plus assorted bits
Kreg Pocket hole Jig
Clamps
Orbital sander plus 120- and 240-grit sanding pads
Tape measure and pencil
Safety gear
HERE'S HOW:
Preparation
- Have all the pieces cut to size at your nearest Builders store for easy assembly. Having all the pieces cut beforehand reduces the need for expensive tools needed to cut everything at home.
- Sand all the cut pieces prior to assembly. Sanding after assembly makes it difficult to get into tight corners.
- After drilling all the necessary pocket holes, apply the exterior sealer to all the sections. Again, it is easier to do this before assembly.
Step 1 - Side Panels
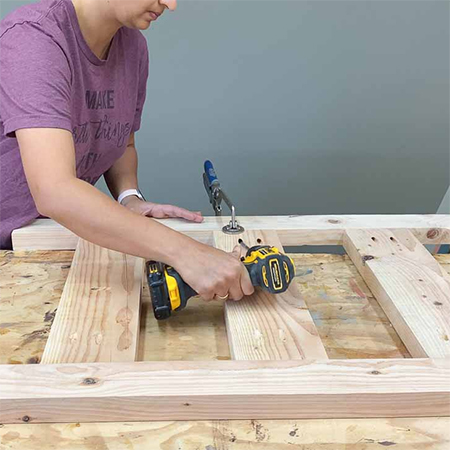
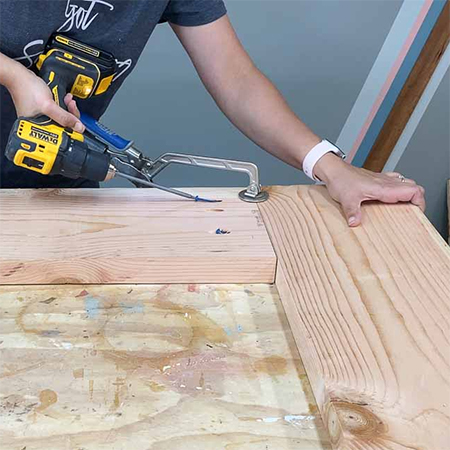
Drill [3] pocket holes at both ends of the side slats. Secure these onto the legs using wood glue and 32mm screws. Mount them so that the pocket holes will be on the inside and not visible. Place the slats are the front (outside) of the legs. Repeat this for the second side panel. Note that there is a 40mm gap between the slats and a 50mm gap from the bottom to the base of the lowest slat.
On the top two Side Panels drill an additional [2] pocket holes that you will use to attach the bar top.
Step 2 - Front Panel
Drill [3] pocket holes at both ends of the front slats. Secure these onto the legs at both sides using wood glue and 32mm screws, allowing a 40mm gap between the slats and a 50mm space from the base of the legs to the bottom slat. Mount them so that the pocket holes will be on the inside and not visible. Place the slats are the front (outside) of the legs.
On the top Front Panel drill an additional [4] pocket holes that you will use to attach the bar top.
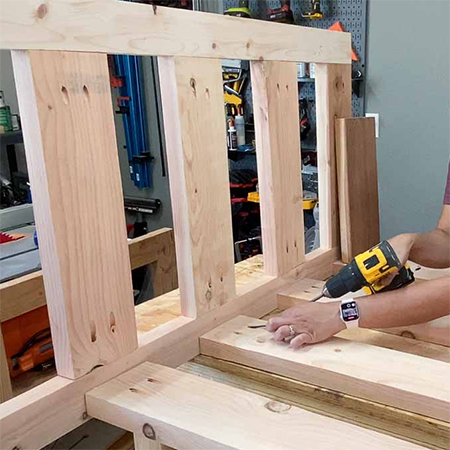
Step 3 - Assemble and Attach the Bar Top
Assemble the bar top by drilling [3] pocket holes where the ends of the bar top front will be secured. DO make sure that the top planks will be flush by using clamps to prevent any movement whilst securing them together. Use wood glue and 32mm screws.
To secure the bar top in place, drive 32mm screws through the pre-drilled pocket holes for securing the bar top in place.
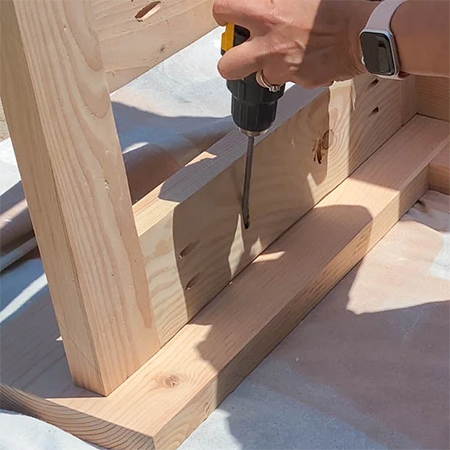
Step 4 - Attach Shelves
Drill [2] pocket holes at both ends of the two shelves and use wood glue and 32mm screws to fasten the shelves in place.
Finishing
With the sanding having been done prior to assembly and if you haven't already applied an exterior sealer, do this now. Follow the manufacturer's guidelines for proper application and repeat this when you see the finish start to fade and dull. This will extend the lifespan of your new outdoor bar.