
Transform a deck or patio for entertaining
Transform a deck for patio into the ultimate outdoor space for your family - or for entertaining friends.
With some DIY creativity you can create the ultimate outdoor space. Perfect for entertaining friends, dining outdoors, or simply sitting back to relax, transform your deck or patio into the perfect place to while away warm summer evenings. You will find this project budget-friendly and easy to do with basic DIY skills and tools.
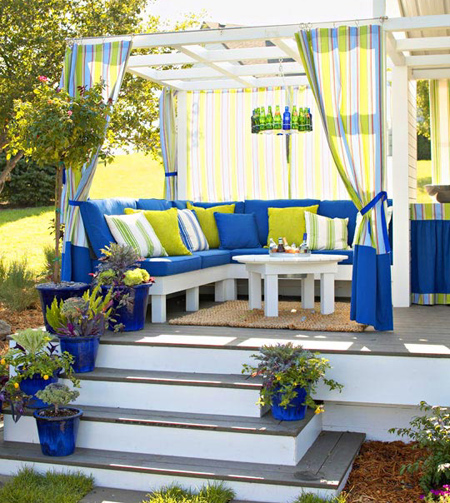

Multi-purpose outdoor rooms are becoming increasingly popular as homeowners realise the potential of utilising outdoor areas to increase living spaces. A free-standing structure doesn't require planning permission, but before you start this project, look at what you will need and what you want for your entertainment area.
If you like to entertain, plan for plenty of seating. If you have an active family, think about how the kids might utilise the space. Do you love outdoor cooking and grilling? Think counter space, storage, and cookware.
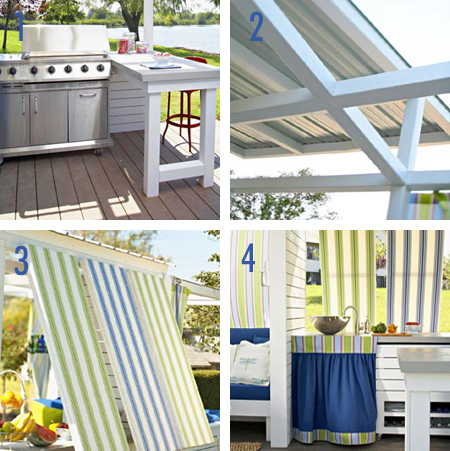
CLOCKWISE TOP LEFT:
1. If you don't already have a deck in place, or a patio slab, think about the options for flooring your entertainment area. A concrete slab is the most affordable and is virturally maintenance-free, as is composite decking. We offer advise on various other flooring options for your outdoor entertainment area and even how to build a deck in a day.
2. PAR pine framing and beams offer support for an IBR sheet metal roof. All wood needs to be properly primed and painted after assembly.
3. & 4. Canvas or outdoor fabric awnings stretch from the roof to countertop height to provide shade from the hot sun. When placing your outdoor entertainment area, take into consideration the angle of sunlight during the hours 11:00 to 13:00 to provide plenty of shade. Outdoor fabrics are manufactured to be uv-, stain- and mould-resistant.
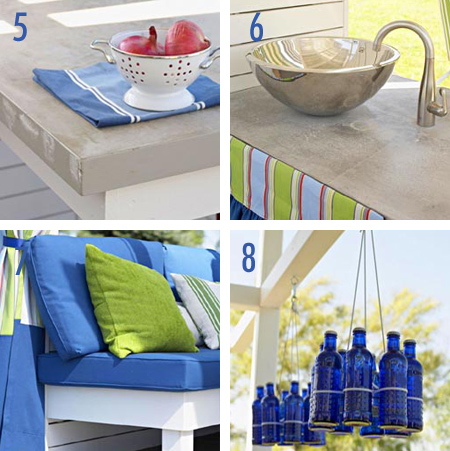
CLOCKWISE TOP LEFT:
5. Carefully consider what material you use for the countertops in your entertainment area. Most ready-made countertops don’t weather well and you might want to consider using natural materials, such as stone, granite, or slate. While these might be a bit too pricey for your budget, concrete countertops work out affordable if you have the time to make your own. Create shutterply forms and pour concrete.
There are plenty of fun ways to embellish plain concrete. Press in small stones or stamp on cool designs. For upkeep, simply seal concrete twice a year with concrete sealer.
6. Rather than go to the expense of installing full-on plumbing for an outdoor entertainment area, a stainless steel basin drains into a bucket under the countertop. The water is then used for watering plants and lawn. An outdoor sink is a cinch to install if you simply set up the tap to draw water via a hose-pipe connection.
7. Make your own PAR pine garden chairs - stain and seal or paint them in your choice of colour. See below for instructions. Add comfort with medium-density foam covered in outdoor fabric and dressed with colourful cushions.
8. Add lighting with ambience with DIY chandeliers made using recycled materials. The ones shown here are made with a recycled biscuit tin lid surrounded by a ring of colourful glass bottles. It gets its glow power from inexpensive tea-light candles mounted on the tray and radiates a beautiful flickering light at night. Alternatively, have an electrician wire up your outdoor entertainment area and add low-voltage LED lighting.
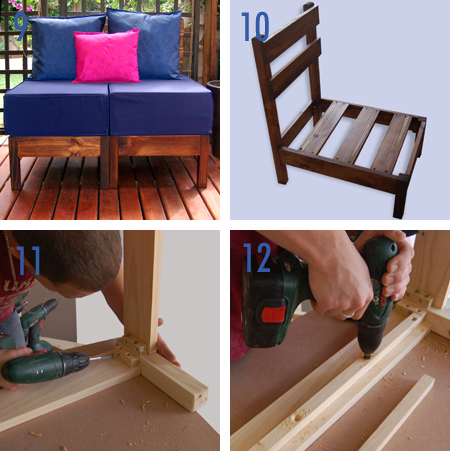
Making basic garden chairs
9. Making a set of basic garden chairs is an easy DIY project that you can tackle in a weekend. Your local Builders Warehouse stocks a wide selection of PAR pine that you can use to design your own garden furniture.
10. Follow the instructions below for a design that is sturdy and practical, and allows for adding on as many garden chairs as you like.
11. To make the seat frame, join the front, sides and back to the legs using small blocks of wood. Doing it this way allows you to conceal all visible screws.
12. Insert a batten or support beam along each side at a depth equal to the thickness of the seat slats; place the seat slats on top of the support and screw in place. The back is a section comprising legs/uprights and slats, which attaches to the seat frame.