
Fix a broken tile without power tools
Let's get back to basics here by removing and replacing a broken tile... without using power tools. Not everyone can afford to buy the latest power tools and repairs still need to be done. So, with this in mind, try the following step-by-step for removing a replacing a broken wall or floor tile.
You might not need power tools for this project, but you still need some must-have tools that every homeowner should have in their toolbox... a hammer for one.
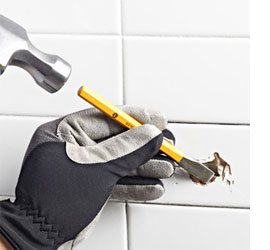
Position the tip of your chisel near the centre of the tile and give it a light tap. You’re not carving a statue here, so start gently and add force gradually. As bits of tile begin to break free from the centre, find a spot where you can wedge the chisel between the tile and the wall. With moderate taps, loosen broken pieces of tile from the centre.

Once you establish your starting point at the centre, use moderate taps to work your way toward the tile edges. With all of the tile and adjoining grout removed, use a stiff-bladed putty knife to free any loose adhesive still attached to the wall. It doesn’t need to be perfectly smooth, but it must be free of anything that would keep the replacement tile from resting flush with the others. Chip off any remaining grout around the opening. Finish by vacuuming dust from the opening.
Test-fit the replacement tile in the opening and check that its surface rests slightly below that of the surrounding tiles. You don’t need any fancy tools for this job; your fingertips will sense the differences in thickness.
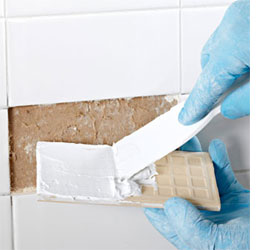
Apply an even 3mm layer of tile adhesive on the back of the tile. (It’s called 'buttering' the tile, even though it goes on more like creamed cheese). Press the tile into position, centering it in the opening.
Check the tile position immediately and confirm that it aligns with the surrounding tiles. Tape the replacement tile to the surrounding surface to hold it in position. Allow the adhesive to dry overnight or as recommended by the manufacturer.

Use a premixed grout or mix grout to the consistency of peanut butter and use the tip a plastic putty knife to press it into the grooves surrounding the tile. Also, fill any grout areas damaged during removal of the tile.
For a job this small, use your fingertip as a grout-smoothing tool to level it with the tile edges. Use a moist sponge to smooth the grout even with the tile edges and wipe away the excess. Avoid exposing the repair to moisture for several days as the grout hardens.
After about a week, apply grout sealer to the new grout to protect it from moisture. Allow a few extra hours to clean and seal the grout around the surrounding tile surfaces as well for long-lasting protection.