
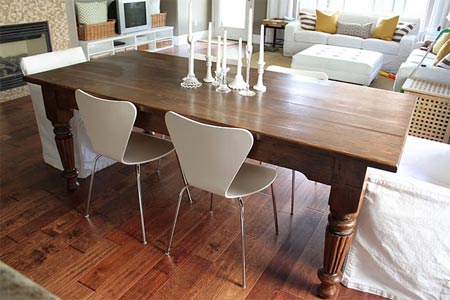
Farmhouse table restoration
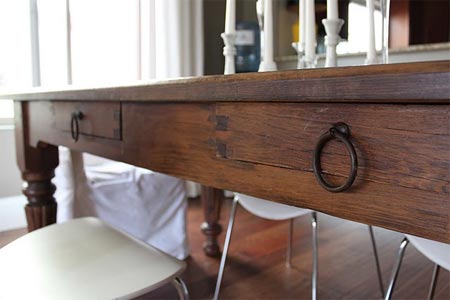
I love the rustic, farmhouse feel of this table. The more wear and tear it receives the better it will look. What I love even more is that it reminds me of something I might see in an expensive furniture store and I probably paid a fraction of the price!

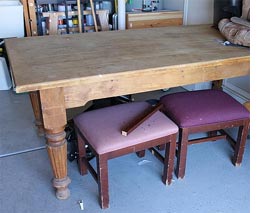
You will be surprised at the bargains you can pick up at residential auction sales. You normally see them advertised on posters or in your local newspaper. I found this farmhouse dining table at a local auction. The original owners had it sitting in their garage for several years.
The table was drier than dry and cracked in several places due to lack of attention, but I could see it had good bones. The table cost R1200 - not bad for a table of this size and in this condition. I don't know what wood it is but it's definitely not pine and doesn't look like oak, but it is heavy and the wood is dense.
If you want to tackle furniture restoration, there are some techniques that you need to follow if you want to restore furniture to its original condition:
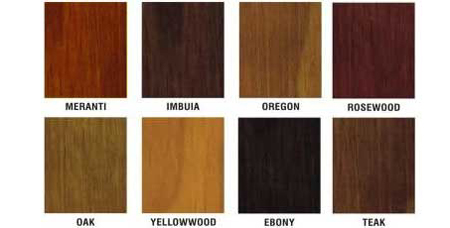
Veneer finish
I prefer to stay clear of furniture that has a veneer finish. It normally indicates that furniture is manufactured from either chipboard or supawood. Plus it is hard to sand or restore veneered furniture.
Good bones
Any piece that you select for restoration needs to be in reasonably sound condition. You don't want to have to spend too much money on the restoration. You can fix things like wobbly legs if only a bit of screwing and gluing is needed.
Visible damage
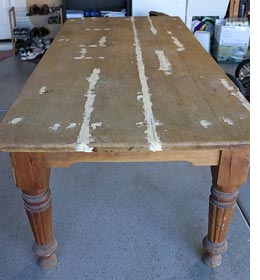
Chipped wood, or where chunks have been chipped off, can be fixed with Alcolin QuikWood, but bear in mind that it's better not to repair these if they are going to be highly visible - such as on the top or the front of the piece.
Smaller cracks can be repaired with wood filler. You will need to use a wood filler that is the same colour as that used for the final finish. In other words, if you plan to apply a dark stain - use a dark wood filler.
Remove filler
During our DIY Divas workshops I have noticed that many women are not fond of the sanding part of a project. However, after using wood filler you do need to sand away excess wood filler so that only filler is visible in the filled crack. Wood filler does not stain well and any wood filler will be visible if not sanded away. If you are taking the time to restore a piece of furniture - do it properly. See more touch-up tips.
Sanding techniques
You will need to use two - or even three - sanders for restoration work, plus a bit of hand sanding as well. See more sanding tips. For small detailed sanding you should use a Multi-Sander. These are the ones that are triangular shaped. The point can reach into corners and tight areas. You can also use a Dremel Multitool with sanding attachment for very detailed sanding, but use on a low speed setting so as not to sand away any detail!
An Orbital or Random Orbit Sander is for flat areas. Start off with 60- or 80-grit sanding pads to remove paint/varnish or for damaged wood. Don't sand in one spot but over the entire area, otherwise you will end up with dips and an uneven surface. Next comes 120-grit sanding to repair the damage done and smooth the surface and finishing off with 240-grit sanding for fine sanding and polishing.
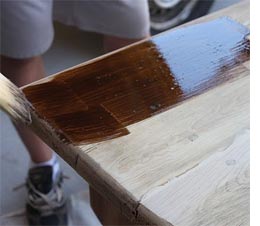
Stain and seal
Wipe the project clean with a slightly damp cloth to remove all traces of dust. Decide on the finish that you want for the project before you start.
It is essential to follow the manufacturer's guidelines for application for proper sealing and protection. For Woodoc products you need to apply three coats: The first coat is absorbed into the wood, the second coat sits just below the surface, and the third coat offers surface protection. You will see that the colour intensity increases as you add each coat. You also need to sand with Woodoc steelwool between the first and second coats. By doing this you remove any excess sealer on the surface so that the second coat can be absorbed.
windhula.blogspot.com