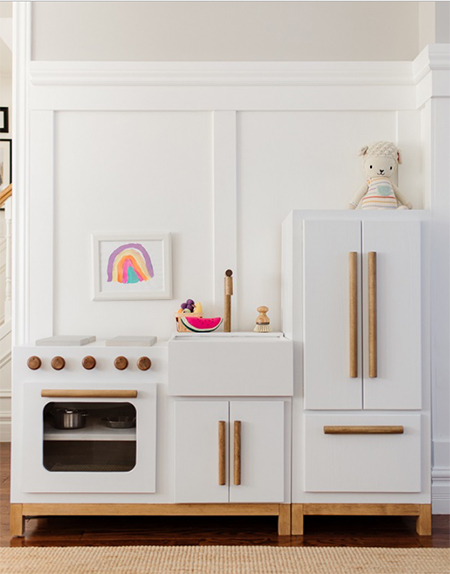
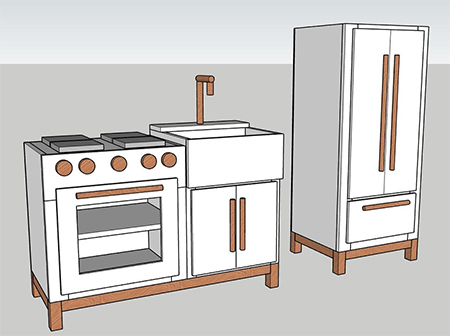
Build a Mini Play Kitchen for your Young Chef
Load shedding or not, the young chef will still be able to present you with a Michelin star meal using this magical DIY kitchen.
15/05/2023
project plans courtesy of Kregtool.com and nick + alicia
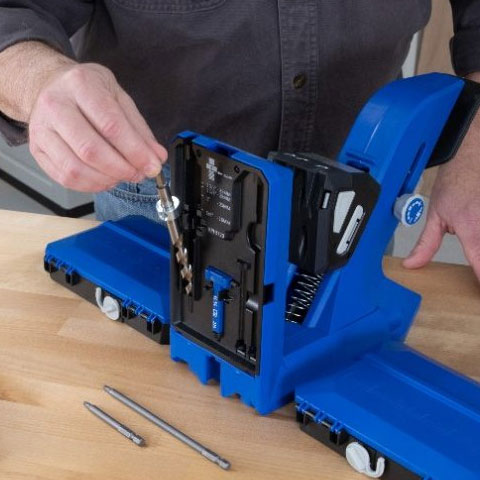
Simple, easy assembly is a breeze when you use a Kreg Pocket Hole Jig for this project. Made using 16mm SupaWood (MDF) that you can purchase at your local Builders store, this DIY mini kitchen is just perfect. Click here for more fantastic projects.
Using SupaWood means that it is easy to paint using a paint roller and paintbrush and acrylic PVA in almost any colour you want and the hardware such as handles and knobs can also be purchased at Builders, or you can make your own using PAR pine.

Any little chef would love to set up house with this mini kitchen. If it is easier, install wheels on the cabinets so that the mini kitchen can be moved anywhere without hassle.
YOU WILL NEED:
2 Sheets of SupaWood/MDF 16mm
2 of PAR pine 44 x 44 x 2400mm
1 of PAR pine 22 x 44 x 2400mm
2 of PAR pine 22 x 76 x 2400mm
2 ½” Pocket Hole Screws
1¼” Pocket Hole Screws
4 of 30mm cut screws
14 of Butt hinges and 16mm screws
6 of Magnetic door catches and 16mm screws
Wood glue
1 of Duracryl/Acrylic/Perspex for the stove door - cut to fit
Shelf Pins (optional if doing shelving in fridge)
CUTTING LIST:
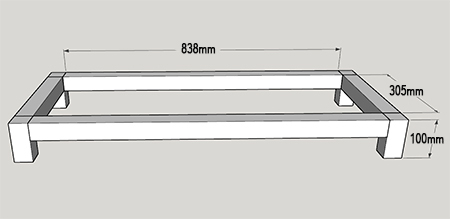
- Bases
2 x 44 x 44 x 838mm PAR pine - long base
2 x 44 x 44 x 305mm PAR pine - long base
4 of 44 x 44 x 100mm PAR pine - long base
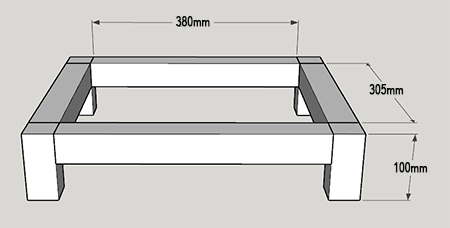
2 of 44 x 44 x 380mm PAR pine - short base
2 of 44 x 44 x 305mm PAR pine - short base
4 of 44 x 44 x 100mm PAR pine - short base
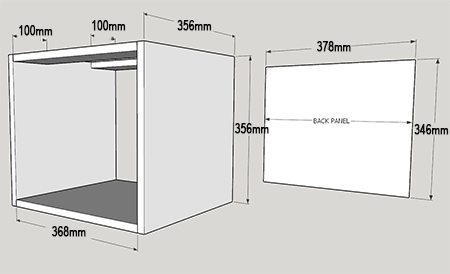
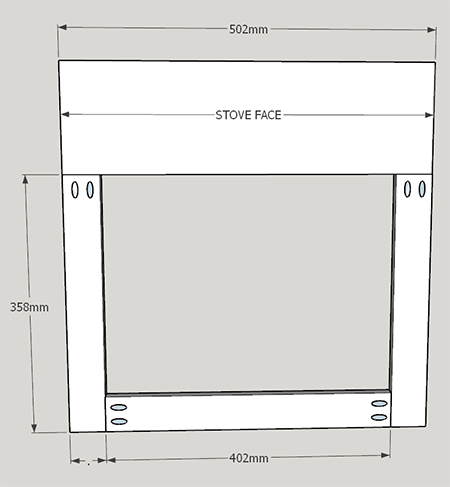
- Stove
3 of 356 x 470mm 16mm SupaWood - top/bottom/shelf
2 of 356 x 508mm 16mm SupaWood - sides
1 of 490 x 500mm 3mm Masonite - back panel
1 of 150 x 502mm 16mm SupaWood - face top
2 of 50 x 358mm 16mm SupaWood - face sides
1 of 50 x 402mm 16mm SupaWood - face bottom
1 of 376mm x 462mm 16mm SupaWood - door
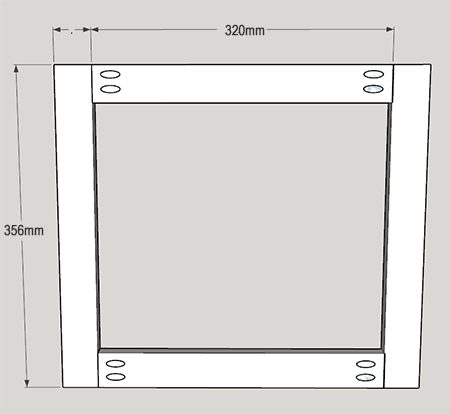
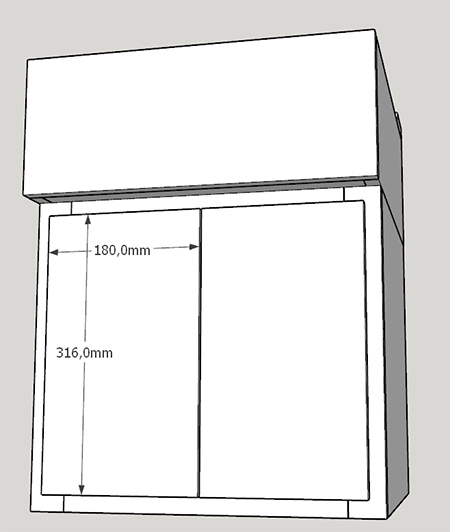
- Sink
2 of 100 x 368mm 16mm SupaWood - top supports
1 of 356 x 368mm 16mm SupaWood - bottom
2 of 356 x356mm 16mm SupaWood - sides
1 of 346 x 378mm 3mm Masonite - back panel
2 of 40 x 356mm 16mm SupaWood - face sides
2 of 40 x 320mm 16mm SupaWood - face top/bottom
2 of 180 x 316mm 16mm SupaWood - doors
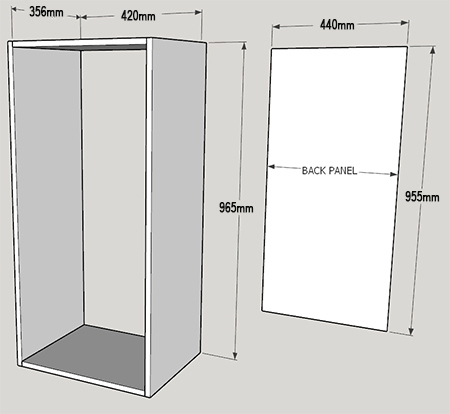
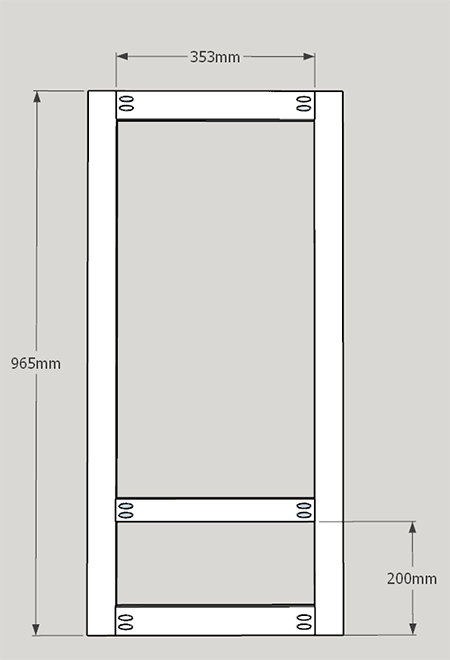
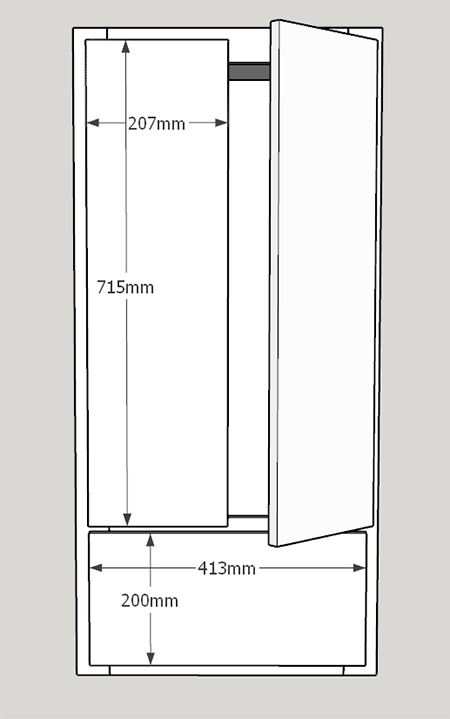
- Fridge
2 of 356 x 420mm 16mm SupaWood - top/bottom
2 of 356 x 40mm 16mm SupaWood - shelves
2 of 356 x 965mm 16mm SupaWood - sides
1 of 440 x 955mm 3mm Masonite - back panel
2 of 50 x 965mm 16mm SupaWood - face sides
3 of 50 x 353mm 16mm SupaWood - top/middle/bottom
2 of 207 x 715mm 16mm SupaWood - doors
1 of 200 x 413mm 16mm SupaWood- bottom flap
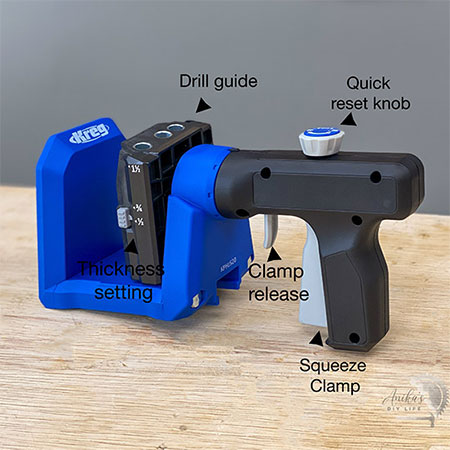
The Kreg 520 or 720 Pocket Hole Jigs are the ultimate assembly tools for the DIY enthusiast, carpenter, woodworker or contractor. Packed with features and easy to use, these compact pocket hole systems guarantee accuracy time after time. Purchase any Kreg Jig system from online tool suppliers or at select hardware stores around the country.
TOOLS:
Kreg Pocket Hole Jig
Jigsaw, circular saw, or table if cutting the components yourself
Orbital Sander plus 120 and 240-grit sandpaper
Heavy-duty stapler or hammer and panel pins
OPTIONAL: Kreg Plug Cutter
Clamps
Tape measure and pencil
Safety gear
HERE'S HOW:
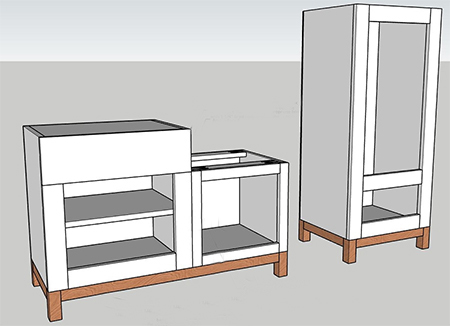
Step 1 - Bases
Assemble the two bases, long and short, using the 44 x 44mm PAR pine and according to the diagrams below using a Kreg Pocket Hole Jig, wood glue, and pocket holes screws to join the components together
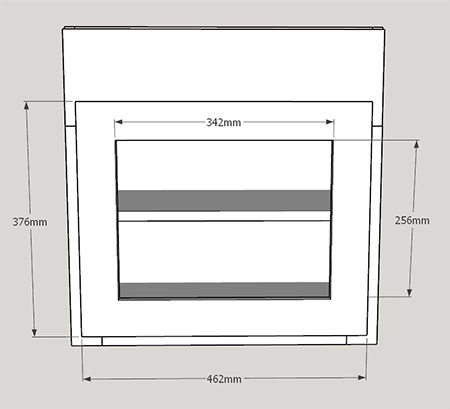
Step 2 - Stove
Drill [4] pocket holes on both ends of the top and bottom (356 x 470) on the bottom face. If you don't want the pocket holes to be visible, fill with ready-made Kreg plugs or use a Kreg Plug Cutter to make your own plugs. Apply wood glue to the pocket holes, squeeze in the plugs, leave to dry and then sand smooth. Once the stove unit is assembled, staple the backing board in place.
Use the diagram below to assemble the stove unit using wood glue and pocket hole screws.

Step 3 - Sink Cubbie
Assemble the components for the sink cubbie in the same way by drilling [2] pocket holes on either side of the top supports and [4] holes on either side of the base.
Step 4 - Fridge
Last is the fridge cupboard, this has pocket holes that are the same as the stove unit with [4] holes on either side of the top and bottom piece.
Step 5 - Face Frames
Assemble all 3 face frames as shown below. Drill the pocket holes on the back of the face frames so that they are not visible once fastened in place.
STOVE
SINK
FRIDGE
Step 6 - Sanding and Painting
With the cubbies made, you can take the time to sand and paint these before assembly. Use plugs to fill in the pocket holes with wood glue and sand once dry. You can paint the components using a paintbrush and paint roller or a spray painting system.
Step 7 - Attach Face Frames
The face frames are attached to the respective cubbies using wood glue and panel pins. The stove and sink cubbie are fastened together with 30mm screws on top of the longer base frame.
DIY TIP: Use [2] butt hinges for each door and [2] magnetic catches at the top of the frame to hold the doors closed.
DIY TIP: Use [3] butt hinges for each door and [2] magnetic catches at the top of the frame to hold the doors closed. Use [2] butt hinges and [1] magnetic catch for the bottom flap.
For the stove door cut out an opening to fit a piece of Perspex or Duracryl. The latter is available at Builder in various sizes and, similar to Perspex or acrylic, it will not break. Use a router to make a ledge around the cutout at the back to hold the glass and apply silicone sealer around the edges to hold in place.
DIY TIP: Use [2] butt hinges at the bottom of the stove door and [2] magnetic catches at the top.
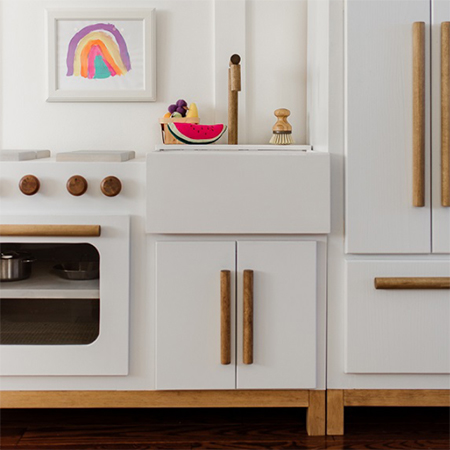
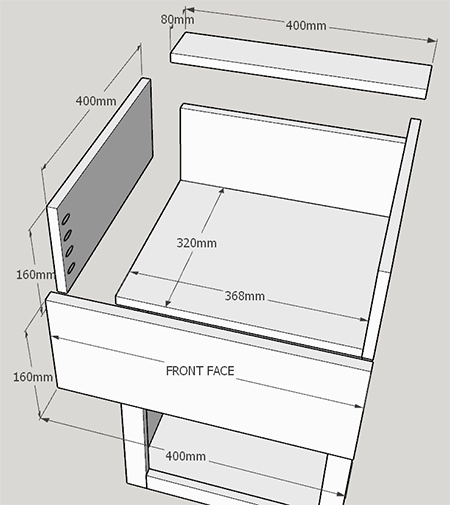
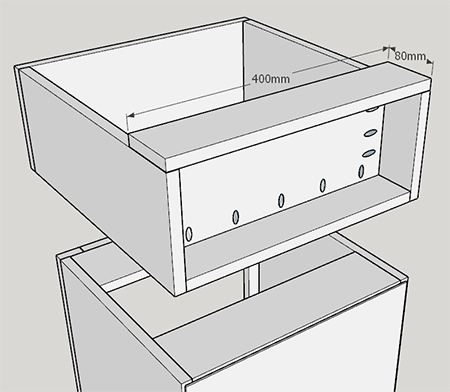
Step 8 - Assemble the Sink
Use the diagram below to assemble the sink with wood glue and pocket hole screws. The sides and front face are built around the base and the back is placed 80mm in from the edge of the base to allow the tap support to be mounted and flush as the back (with the sides).
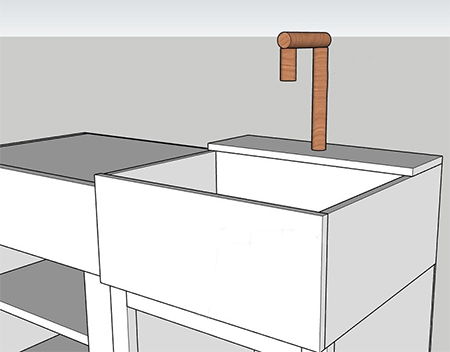
Step 9 - Attach Sink to Cubbie
Paint the sink before securing the base to the sink cubbie with 30mm cut screws from under the cubbie and into the two top supports..Buy or make a tap for the sink. Builders have a selection of economical fittings that would be perfect for this!
Step 10 - Accessories and Hardware
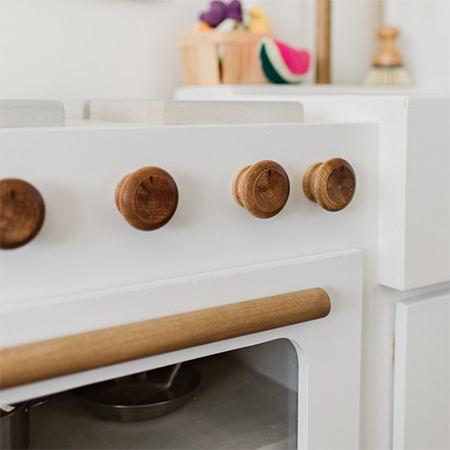
All the accessories shown for this kitchen were cut from round dowels and wood scraps. If you prefer, you can pop into Builders and purchase readymade handles, knobs or accessories to finish off the mini kitchen.
DIY TIP: Coffee can lids make great hotplates for the top of the stove!