
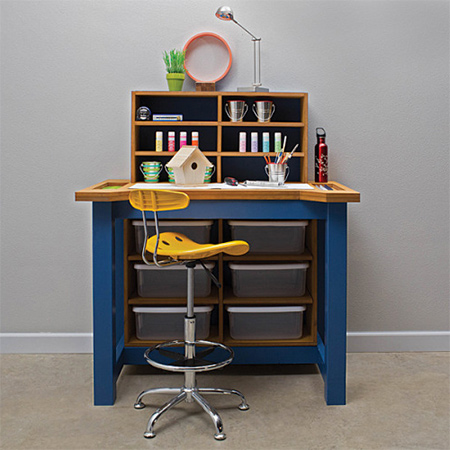
DIY practical craft or work station
This practical work station provides the perfect place to pursue a variety of hobbies. It offers a large bench top with built-in trays for small items, plus shelves up above to hold even more. Underneath, shelves hold plastic storage bins so you’ll always be able organize your supplies.
YOU WILL NEED:
2 of 724 x 1220mm x 16mm MDF - tops
2 of 222 x 457mm x 16mm MDF - cubby sides
3 of 222 x 880mm x 16mm MDF - cubby top / shelves
3 of 134 x 222mm x 16mm MDF - shelf dividers
1 of 457 x 912mm x 16mm MDF - cubby back
2 of 275 x 1005mm x 16mm MDF - storage unit top / bottom
3 of 275 x 658mm x 16mm MDF - storage unit sides / centre
4 of 275 x 494mm x 16mm MDF - storage shelves
1 of 692 x 1005mm x 16mm MDF - storage unit back
4 of 67 x 67 x 890mm PAR pine - legs
4 of 32 x 67 x 483mm PAR pine - short stretchers
5 of 32 x 67 x1006mm PAR pine - upper / lower long stretchers
30 of 65mm Pockethole screws
15 of 40mm Pockethole screws
90 of 30mm Pockethole screws
24 of 30mm wood screws
Wood Glue
16 shelf pins
Paint, preferably acrylic sheen, to finish base section
Woodoc 10
TOOLS:
Drill/Driver plus assorted bits
Countersink bit
Kreg Pockethole Jig
Jigsaw
Orbital sander plus 120- and 240-grit sanding pads
Tape measure and pencil

HERE'S HOW:
1. Use your pockethole jig to drill [2] pocketholes in the short stretchers and secure these to the legs with 65mm pockethole screws to create the sides.
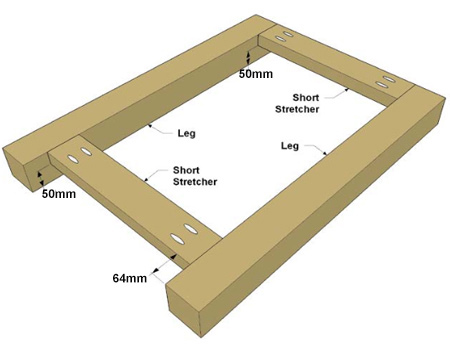
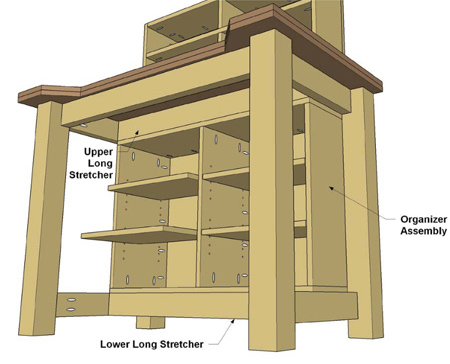
2. On the long stretchers, drill pocketholes in three of pieces to create [3] Upper Long Stretchers and [2] Lower Long Stretchers. See diagram below for placement of pocketholes.
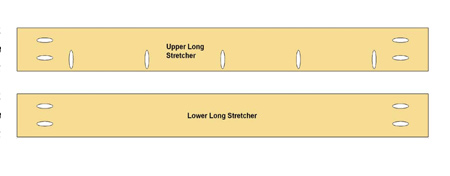
3. Secure to the legs with 65mm pockethole screws.
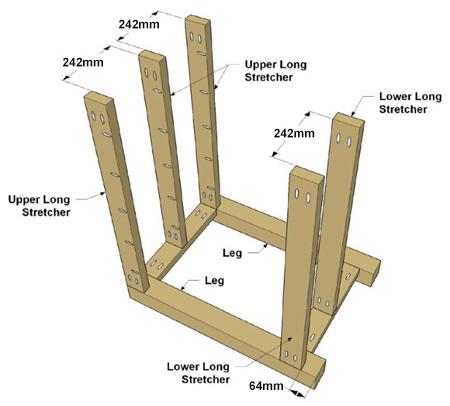
GOOD TO KNOW:
That the back stretchers are
mounted flush with the back edge of the legs.
All other short and long stretchers are
positioned flush with the inside edge.
4. Make the countertop using two layers of 16mm MDF. On both pieces, mark 150 and 200mm from the sides, and 100mm from front edge. Draw an angled from front 150mm to 200mm on both sides and cut out with jigsaw. On what will be the top countertop, mark a line at 40mm from sides and 130mm from front. Cut out [2] rectangles 114 x 362mm.
5. Glue these two sections together and drive in a few 30mm screws through the underside..
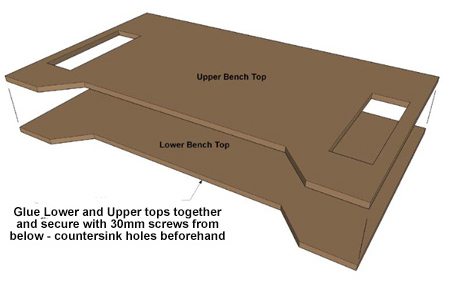
GOOD TO KNOW:
Don’t worry about exact screw
placement, except to avoid the tray areas. Sand
before gluing the sections together.
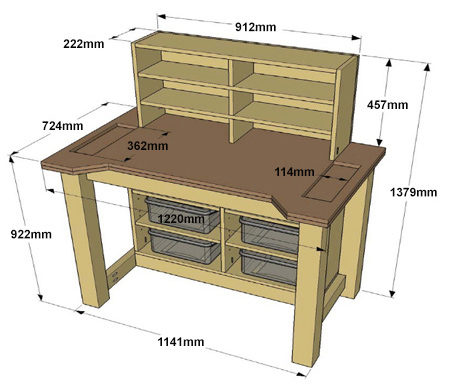
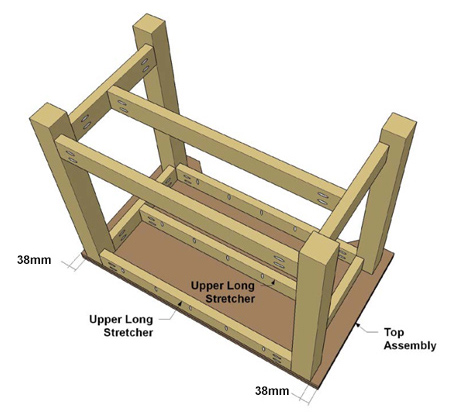
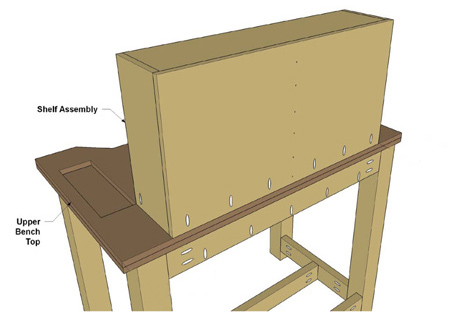
5. Attach the base assembly to the top using 40mm pockethole screws, making sure the top is flush with the back, and that the top overhangs equally on both sides.
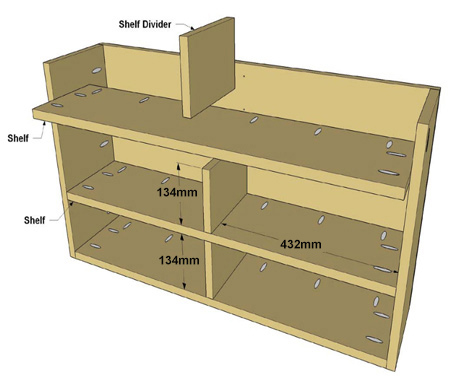
6. Drill pocket holes in the cubby sides, shelves and top as shown below, as well as along the bottom edge (back side) of the back. Attach the sides and top to the back section.
7. Measure and mark at 432mm in from both sides to centre the shelf divider. Use 30mm screws through the back and into the shelf divider. Note: Drill 2mm pilot holes for all dividers.
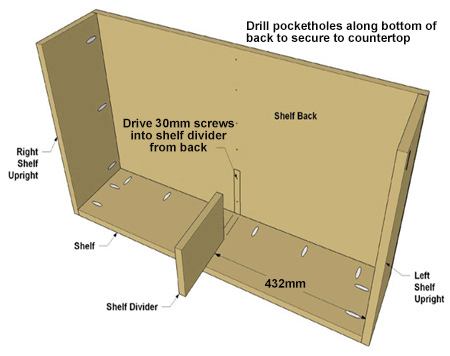
8. Attach a shelf and the next shelf divider.
Apply wood glue along one long edge of a divider
and position so it is centred
on the length
of the shelf before driving screws through the
back. Repeat for the next shelf.
9. Secure the cubby section to the countertop using wood glue along the side edges and 40mm pockethole screws.
GOOD TO KNOW:
Sand the entire cubby assembly
before attaching to the countertop.
10. On the bottom and top storage sections mark at 510.5 (16 + 494,5) in from both sides
11. Attach the sides, bottom and top to the back. Insert the centre divider and secure in place. You can clearly see where to drill pocketholes in the diagram below.
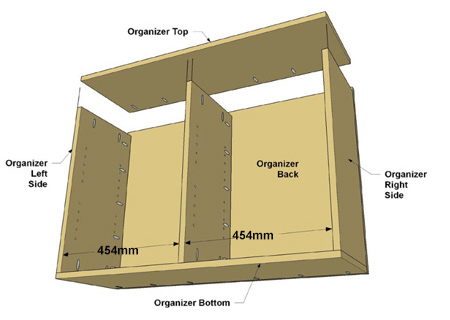
12. Drill holes for the shelf pins to mount adjustable shelves according to the height of your plastic storage bins.
Finishing
Sand all the completed sections prior to assembly to make it easier to paint and seal. The bottom section was painted, but the remaining MDF sections were given three coats of clear Woodoc 10 interior sealer.

api.ning.com
Not responsible for errors or omissions.