Use stock cabinets to make a custom dining room server or sideboard
There are plenty of places to pick up ready-made kitchen cabinets, and with a little tweaking here and there, you can create a custom dining room server or sideboard in a weekend.
What makes these cabinets so affordable to make is that you can use pine plywood edged with a veneer strip. A sheet of plywood costs around R400, so you could save yourself around R2000 or more on the price of buying this unit in a furniture store.
YOU WILL NEED:
Ready made kitchen cabinets*
19mm plywood - cut as needed
10mm-thick PAR pine strips
3 x 30mm wood screws
5 x 50mm wood screws
Wood glue
Edging veneer
Double-sided and masking tape
Door handles
4 bought feet and long screws
Plascon Ultra Varnish
Plascon Velvaglo - white
TOOLS
Drill/Driver with assorted bits
Countersink bit
Jigsaw or circular saw
Iron
Craft knife
180-grit sandpaper
Painting supplies
Carpenter’s square
Tape measure and pencil
Quick clamps
Because specifications will differ depending upon the cabinets you use, have all your plywood and timber cut to the required size at your local Builders Warehouse.
HERE'S HOW:

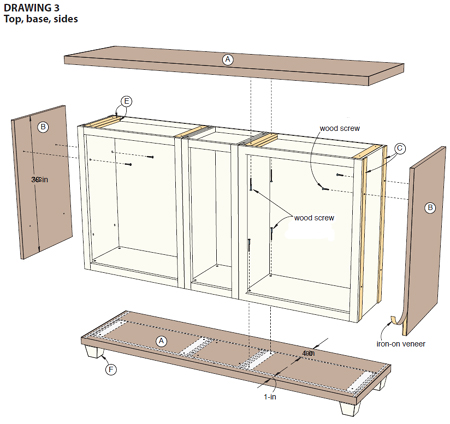
Make a Top and Base
1. The top and base assembly are made from two layers of plywood with a veneer edging. Cut the 19mm plywood to size for the top/bottom panes (A) and the sides (B). If you are using different-size cabinets, measure the overall length of the boxes and add 50mm to determine the actual length.
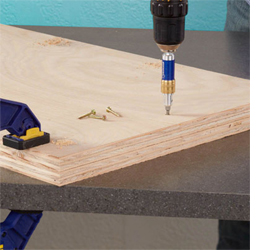
2. On one of the bottoms, drill 3mm holes 50mm from each corner for the threaded inserts used to attach the feet.
This panel will become the lower layer of the base assembly.
3. Align the two layers that make the top or base assemblies, glue them together, and secure them by driving screws through the bottom layer into the top player.
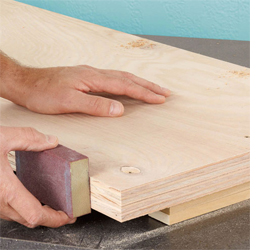
4. Once the panels are assembled, sand the edges smooth to prepare for the iron-on edging strip.
Note: Cut the edging 10mm longer than needed for the ends, and then use the remaining long strip for the front. If you cut them any longer, you risk not having enough strip -- or having to go back to the store for more.
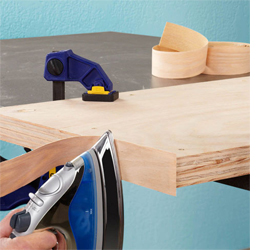
5. Use an iron to attach the strips.
Set the iron on a low setting and allow it to warm up. Where the veneer is wider than the panel, centre the veneer on the edge before placing the iron against the veneer.
Slowly move the iron to activate the glue. Allow the veneer to cool for a few minutes, and then trim it using a craft knife. Use four or five light passes to make each cut. If you press too hard, the knife can slip and damage the wood.
6. Apply the front veneer using the same method. Lightly sand the veneer and the edges smooth, and set the panels aside. Add veneer to the end panels using the same method.
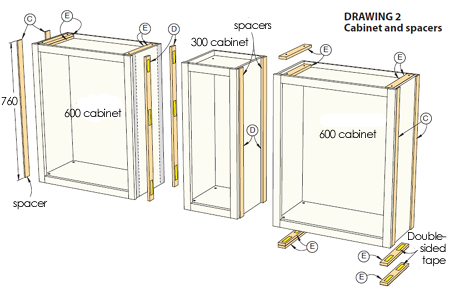
Assemble the Cabinets
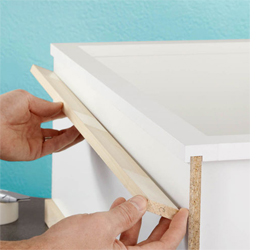
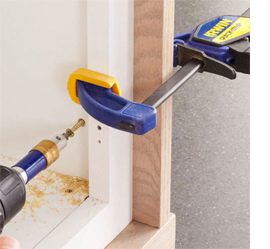
1. Open the cabinets and remove the doors. Cut the end spacers (C) and centre spacers (D) to match the height of the cabinet boxes. Affix the spacers to the cabinets using a few pieces of double-faced tape.
Note: Typical cabinet frames overhang the sides of the boxes by 5mm. This allows the cabinet face frames to be trimmed to fit against a wall that’s not perfectly straight. At the sides of the cabinet boxes where you’ll affix the ends later, you’ll add a 6mm-thick end spacers. Where two cabinets come together, you may need a centre spacer (B) to fill the void between the two boxes.
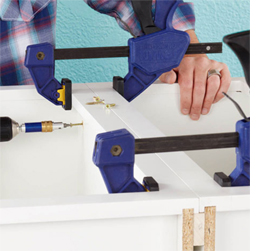
2. Align the cabinets and clamp the face frames together. Drill countersunk pilot holes and drive 3 x 30mm wood screws though the sides to join the boxes.
Apply a Finish
1. Sand all of the surfaces of the top and bottom assemblies, the ends, and the feet with 180-grit sandpaper. Wipe and apply stain or a colour of your choice (you don’t need to apply the stain to the bottom face of the bottom or top assemblies).
2. When the stain dries, apply two coats of Plascon Ultra Varnish following the manufacturer’s instructions and allow it to cure for 24 hours.
3. Sand the feet with 180-grit sandpaper, spray with primer, and let dry. Then sand with 220-grit sandpaper and spray with two coats of white paint.
Final Assembly
1. Cut strips to fit any recesses on the top and bottoms of the cabinets. Lay the cabinet assembly on its back and with the help of double-sided tape, secure them to the bottom of the assembly. You’ll set the top ones in position later.
2. With a helper, set the cabinet assembly onto the base. Align the cabinets so they are centred on the length of the bottom and 20mm back from the front edge. Clamp the assembly down, drill countersunk pilot holes, and drive 50mm screws through the bottom of the cabinet, through the spacers, and into the base.
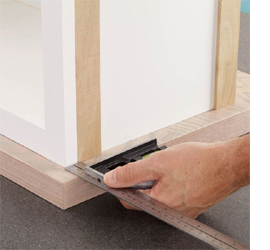
3. Place the side panels onto the base against the cabinets with the front of the panels flush with the front of the base.
Clamp in position and drill pilot holes. Secure the ends to the cabinet by driving screws through the side, through the spacers, and into the panels. Repeat for the opposite end.
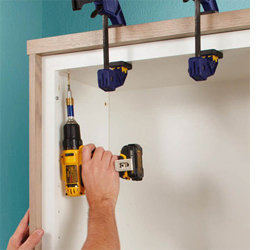
4. Place the spacers (E) on top of the cabinets.
Set the top assembly in position as you did the base assembly.
Drill pilot holes and drive screws up though the top of the cabinet, through the spacers, and into the top.
5. Lay the cabinet on its back to screw the feet to the base.
6. Re-install the doors on the cabinets. Select the pulls of your choice.
Lay out and drill the hardware mounting holes. To protect the finish on the cabinets, place masking tape on the inside and outside face of the door where you’ll drill to prevent chipping the finished surfaces. Mount the pulls to the doors with the screws provided, and reinstall the doors on the cabinets.
Buy everything you need for this project at your local Builders Warehouse.
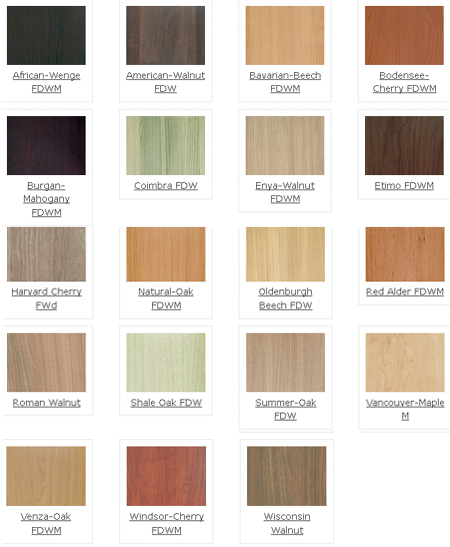
As an alternative to plywood, choose from the wide selection of PG Bison MelaWood wood grain finishes for the top, sides and base of your dining room server or sideboard. You will find a varied selection of PG Bison MelaWood products at your local Builders Warehouse.