
Create An Accent Wall In Under An Hour
A can of paint and a few other materials are all you need to create a focal point or accent feature on a wall in a home.
05/03/2024
dulux
Right now, South Africans are feeling the pinch in so many ways and the future isn't as bright and rosy as we would like. This simple project will inject a dose of fun and colour into a room and shouldn't take longer than an hour to complete once you gather everything you need. It might not seem like much, but just as retail therapy gives you a boost, so will changing the look of a room. As the saying goes, "A change is as good as a holiday!"
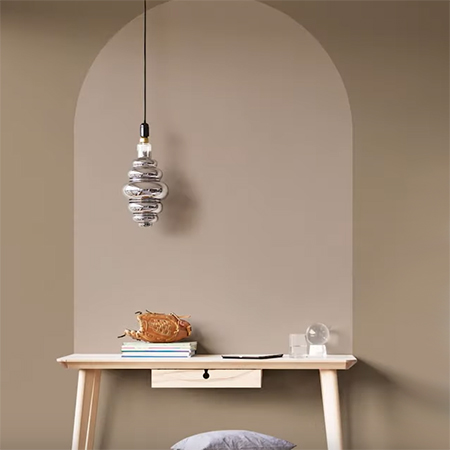
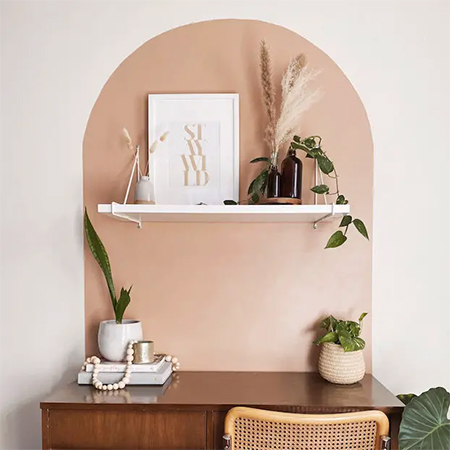
You don't realise how much difference a simple arch shape can make on a wall until you do it yourself. It is so easy to transform a plain or boring wall simply with a small can of paint and a few tools and materials and you can buy everything you need for this project at any Builders store around the country.
Refresh a room and give it a new look with this 1-hour project that is easy for anyone to do.
thisgirllovescolour.com
Arch shapes were trendy and happening in 2019 but I have never been a follower of trends. I prefer to like something for how it would look in my home and not whether it is currently a trend or not. Painting shapes onto walls has been popular for hundreds of years and there is no reason why you cannot add any shape to a wall if you want to introduce a splash of colour or add an eye-catching feature to a room - and paint is still one of the most affordable ways to do this.
josiemichelledavis.com
How to paint an arch on a wall
Painting an arch shape on any wall is not a difficult project and the hardest part of this is to select the right place for the arch shape. You will want it to frame a set of shelves, create an eye-catching feature or just add a splash of colour to a plain wall, so select carefully before you get started.
If you plan on changing the background wall colour at the same time, make sure to do this well in advance so that the paint has plenty of time to dry beforehand - preferably overnight.
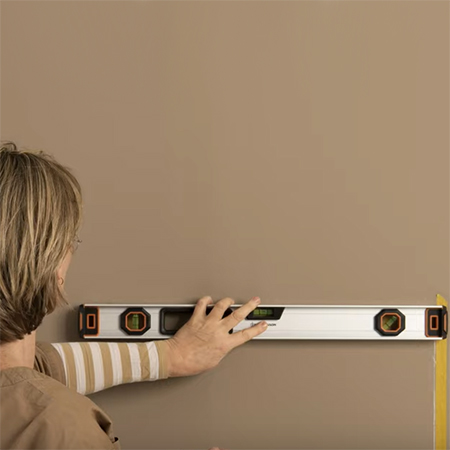
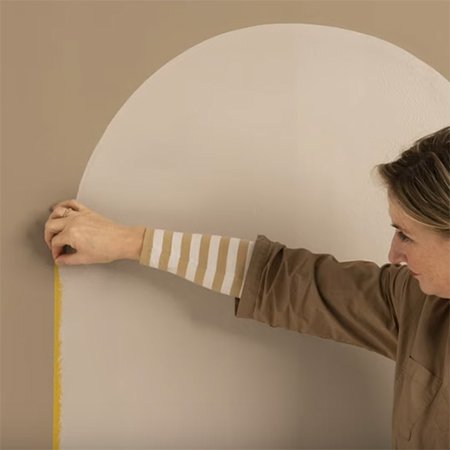
Step 1
You will need a spirit level, tape measure, pencil and painter's tape.
Once you have decided where to place the shape determine the height and width of the shape. Mark the two sides that will form the shape using a tape measure and pencil and then use a spirit level and pencil to mark the height of the shape. Mark every 10 cm or so to make it easier to apply painter's tape along the marks to the required height. Make sure that the pencil marks are on the inside of the tape line so that these will be covered with paint.
dulux
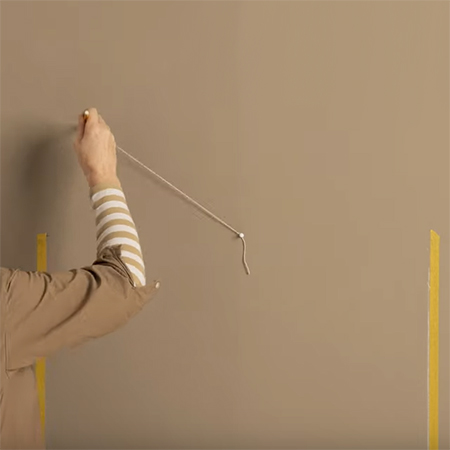
Step 2
You will need a pencil, length of string, small steel pin, hammer and crack filler.
To draw a perfect half-circle at the top of the arch, tap a steel pin into the centre of the rectangular shape using a hammer. After you have finished, you can fill the hole with crack filler and sand smooth before painting. Cut a length of string to knot around the steel pin and extend from one side to the other. Leave enough string at the end to tie a pencil in place to allow you to draw the shape by dragging the pencil from one side to the other.
dulux
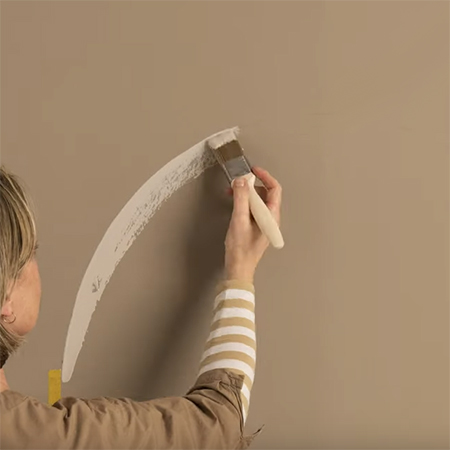
Step 3
You will need paint, paint tray paintbrush and foam paint roller.
Dip the paintbrush into the paint and slowly go around the pencil line that marks the half-circle. Do not overload the brush but rather repeatedly refill with paint as you go.
dulux
Step 4
You will need paint, paint tray and foam paint roller.
Now you are ready to paint the entire arch shape using a paint roller. Work carefully to stay within the outlined and taped areas.

dulux
Step 4
Allow the paint to dry before carefully removing the painter's tape down the side edges.
dulux