
Easy & Affordable Ways To Transform Any Wall In A Home
There are plenty of ideas on social media for easily transforming any wall in a home and here are some of my favourite and most affordable solutions.
27/03/2024
Follow https://www.tiktok.com/@diy.tip.trick.perfect for more DIY projects.
The advent of social media has brought about unlimited ideas and inspiration for homeowners or anyone wanting to beautify their home. With so many thousands of posts being uploaded every single day, it's hard to find ones that stand out and really do offer easy and affordable solutions that you might be searching for. I have come across several TikTok vloggers who post DIY projects they have done in and around the home and have included a few of these below with shopping lists and basic instructions that you will need to complete the projects shown. Are you ready to transform a wall or room in your home?
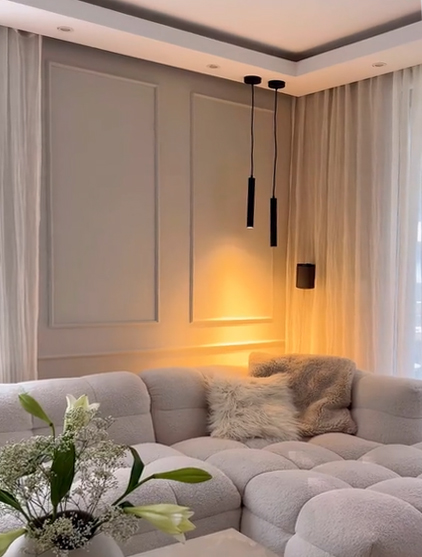
1. Straight Decorative Moulding
Using straight moulding to create a picture frame effect on walls has to be one of the easiest methods for adding drama and impact to plain walls and making them pop. You can create custom moulding using the method mentioned below or you can purchase one of many moulding and trim designs at Builders.
Follow https://www.tiktok.com/@diy.tip.trick.perfect for more DIY projects.
HERE'S HOW:
- Determine the size of the shapes you want on the wall and then use a mitre box and backsaw or mitre saw to cut the corner angles of the moulding or trim. It's a good idea to use painter's tape to mark the measured shapes on the wall as it makes for error-proof installation.
- Make sure to use an adhesive that will stick to both the wall and the paint, something similar to No More Nails adhesive and don't paint the back of the moulding or trim before installation as this will prevent the adhesive from bonding the two surfaces together.
- Paint the installation after 24 hours using a paintbrush to go around the trim and a paint roller for the rest of the wall.
@diy.tip.trick.perfect DIY home decor part215 #DIY #diyproject #diy #decoration #decor #homeworkout #workout #diyhomedecor #diycraft #craft #crafts #ideas #idea #amazing ♬ son original - Diy Perfect
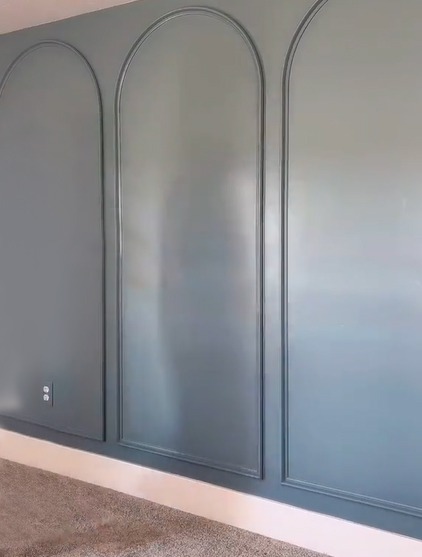
2. Curved Decorative Moulding
Adding moulding or trim to a wall is an easy and instant solution to boring walls. Pine trim and moulding can be found at any Builders store countrywide and is available in a selection of design profiles, widths and lengths. The only downside of this type of moulding or trim is that it only comes in straight lengths, but there is always a solution if you want to DIY it.
Follow https://www.tiktok.com/@diybellacasa for more DIY projects.
HERE'S HOW:
- I have made moulding on many occasions for various projects done over the years and discovered that the best way to make curves similar to those shown above is to use 16mm or 18mm Supawood (MDF) cut into thin strips so that these can be run through my table router. With several profiles to choose from, I can choose the one that works best for the look I want to achieve i.e. whether I want a profile that is formal and fancy or plain slash modern.
- Cut out the straight and curved shapes from a flat sheet of 16mm SupaWood - nothing thinner than this as you will not get a decent profile using thinner board. After cutting out the shapes, sand these by hand sanding to get into the grooves and profile.
- Stick the moulded profiles onto the wall using No More Nails or similar adhesive. It is better to paint the installation once it has been stuck onto the wall so that the paint will not interfere with the adhesive and the paint will cover up any gaps where the moulding has been joined together.
@diybellacasa #foryou #bellacasa #home #decoration #diy #diyproject #diyvideos #diyvideo#DIY #diyhomedecor #diyhome ♬ suono originale - home decor
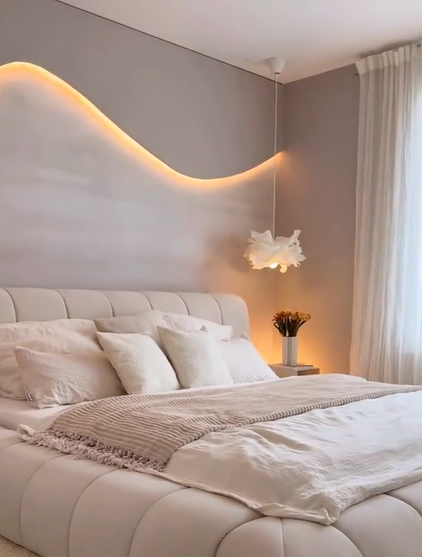
3. Custom Panelling
Custom panelling is another super-easy way to dress up a plain wall, as shown in the bedroom below and isn't as expensive as you might think. What is nice about custom panelling that you DIY is that you can choose any shape you want for the design. In the project below, a gap between the wall and panelling is lighted with LED light strips that flood the room with atmosphere and ambient light.
While you can use hardboard or Masonite for the panelling, keep in mind that these two options are thin and you will need to add more battens to the wall to prevent the panelling from bowing or warping. Rather use a 6mm thick board product such as SupaWood (MDF) or plywood.
Follow https://www.tiktok.com/@diy.tip.trick.perfect for more DIY projects.
HERE'S HOW:
- Measure the total length of the wall to be covered and lay flat the number of boards you will need to complete the panelling. Draw out the design and cut it out with a jigsaw.
- Once you know the design, transfer the measurements onto the wall so that you can install the 22 x 44mm pine battens. The battens should be screwed onto the wall with screws and wall plugs and mounted every 50 cm.
- With screws, panel pins or a nail gun, secure the panelling firmly onto the battens. Fill any holes with wood filler and sand smooth ready for painting.
- Painting can be done with a paintbrush around the edges and a foam roller over the smooth surfaces.
@diy.tip.trick.perfect DIY home decor part215 #DIY #diyproject #diy #decoration #decor #homeworkout #workout #diyhomedecor #diycraft #craft #crafts #ideas #idea #amazing ♬ son original - Diy Perfect