
Easy Christmas Crafts
A few simple crafts ideas for extra special Christmas wrapping, decor and table dressing - for an affordable Christmas at home.
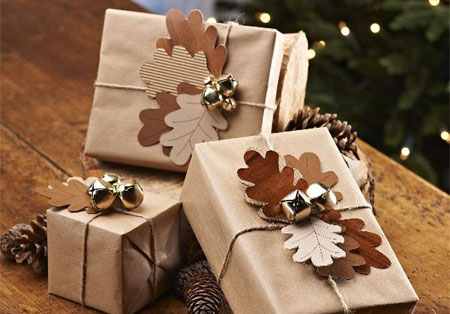
Brown paper gift wrapping
YOU WILL NEED:
Brown paper
Selection of brown card with different textures and colours
String
Gold bells
CONTINUES BELOW
HERE'S HOW:
1. Carefully wrap your presents with the brown paper.
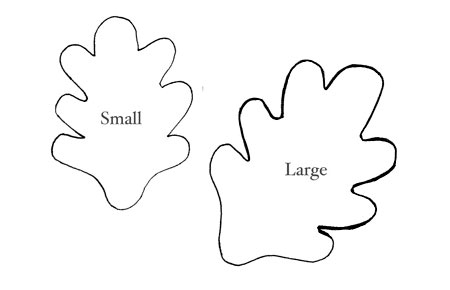
2. From the template below cut out a selection of small and large leaves from assorted brown card. Punch holes in them so they can be threaded onto the brown string.
3. Tie string around the wrapped presents; thread on the leaves and tie a knot.
4. With a glue gun attach the gold bells to the centre of the leaves.
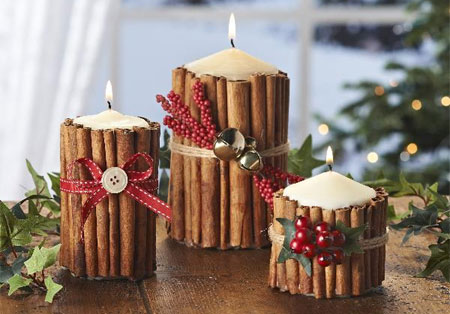
Cinnamon Candles
YOU WILL NEED:
Long lengths of dried cinnamon sticks
Candles of various sizes
Elastic bands (wide enough to fit around the outside of candle)
String
Dried fruit
Decorative ribbons and trim
Microwave
HERE'S HOW:
1. Using your candle as a guide; cut the lengths of cinnamon sticks as evenly as you can to the correct length.
2. Using the two elastic bands, place one at the top and one at the bottom of the candle and place the cinnamon sticks side by side around the edge. Once all of the candle is covered, wind the string tightly around the outside and cut away the elastic bands.
3. Have a tea towel handy. Place candle onto an old small plate and place in the microwave at maximum heat for 25 seconds. Remove from microwave by holding with tea towel and give a good squeeze. Place back into microwave for a further 25 seconds and repeat.
4. The wax should have now melted into the cinnamon to hold it into place. If you feel you need to repeat this process, do it one more time for 15 seconds. Leave to cool fully, out of the way of children.
5. Once cool, remove the string.
6. Decorate the candle by wrapping the rustic string around the middle and attached the dried fruit or trims.
Safety First
Always have a responsible adult present when working with candles. Never leave a lit candle unattended.
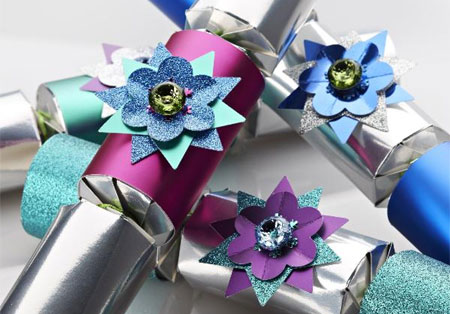
Metallic Accent Christmas Crackers
YOU WILL NEED:
Silver paper
3 Empty toilet roll holders
Coloured embroidery thread
Selection of reflective and sparkly card, in blue, turquoise, pink and silver*
Dremel glue gun and glue sticks
Star paper punches or handmade stars
Flower paper punches or 6 handmade stars
Snowflake paper punches ( optional)
Coloured jewels for flower centres
*If you are unable to find sparkly or glitter paper, once complete apply glue around the sections to be decorated and sprinkle with glitter.
HERE'S HOW:
1. Place the three toilet roll holders lengthwise on your piece of silver paper. Fill the centre holder with a personal gift, paper hat and whatever else you want to add.
2. Roll the paper around the holders, making there is an additional overlap of about 1 cm along the side seam. Stick this seam down with a small amount of hot glue. If you are using a Dremel Glue Gun, have the gun set on 'low' setting.
3. Wrap between the centre and end sections tightly with coloured embroidery thread or raffia and then remove the end holders.
4. Now all your crackers are made, we need to decorate them. To create the star flowers use a punch or hand cut stars. Then punch or hand cut flowers. On your work mat, place one star at the bottom, then glue a second in a different colour on top. Attach so you can see the bottom stars points below. Pinch the petals of the flowers to give a raised effect and glue on top. Attach the optional snowflake punches to the centres then add the jewels on top.
5. Turn each cracker so the seam lines of the card are at the back. Attach each star flower to the top.
available on Etsy
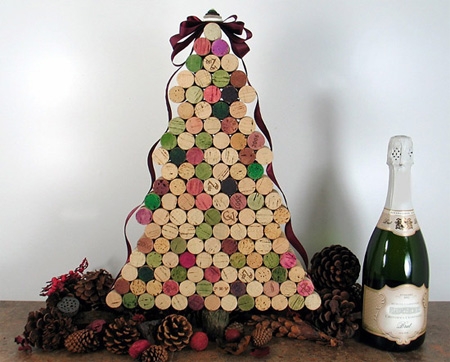
Wine Cork Christmas Centrepiece
YOU WILL NEED:
Wine corks (start collecting now)
Dremel glue gun and glue sticks
Ribbon
Buttons
HERE'S HOW:
1. Starting at the bottom, apply a small dot of hot glue to hold the corks in place.
2. Build the second row in the same way and then glue to the bottom row. Continue to do this until you reach the desired height and size for your tree.
3. Hot glue ribbon to both sides edges of the bottom row, making sure you have enough at the end to make a decorative bow.
4. Top off the bow with a few different sizes buttons - hot glue in place.