
What to do with old pens
When you work in an office there are guaranteed to be plenty of plastic pens tossed out. Here are some unique ways to recycle old pens into very useful items.
I came across a post on curbly that offers a few ideas for using old pens to make various practical crafts. This is the first time I have seen a project using old pens, and when you think that these normally get tossed in the trash, these ideas are a great way to recycle office pens!
YOU WILL NEED:
Plastic bottle with cap
Hose attachment (to fit your type of hose pipe)
15 used plastic ballpoint pens
TOOLS:
Drill / Driver plus assorted bits
16mm spade bit
Craft knife
Tape measure and pencil
HERE'S HOW:
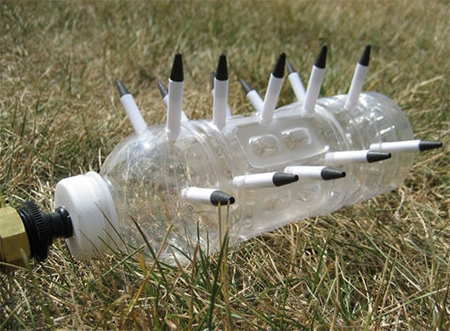
1. Use a drill bit the same diameter as your pens to drill three rows of 5 holes in the bottle.
2. Remove the ink cartridge from the pen and use a craft knife to cut the pens down to a total length of about 50mm.
3. Push the pends into the bottle and use epoxy adhesive to secure them in place.
4. Measure the thickest width of the hose attachment and drill a hole slightly smaller than this in the bottle cap.
5. Use epoxy adhesive to secure the hose attachment to the cap. Apply glue to both sides of the cap. Also apply glue to the inside of the cap - on the lip of the bottle, so that you can twist the cap onto the bottle and secure the seal with glue.
6. Clip on the hose and your new sprinkler is ready for use.
YOU WILL NEED:
12 used plastic ballpoint pens
3 pieces of scrap pine (or even SupaWood)
Wood glue
TOOLS:
Drill / Driver plus assorted bits
Quick clamps
Tape measure and pencil
Wire cutters or cutting pliers
HERE'S HOW:
1. Cut the wood offcuts to the desired length.
2. Take apart the pens. You will need the outer casing, ink cartridge and cone-shaped tips for the project.
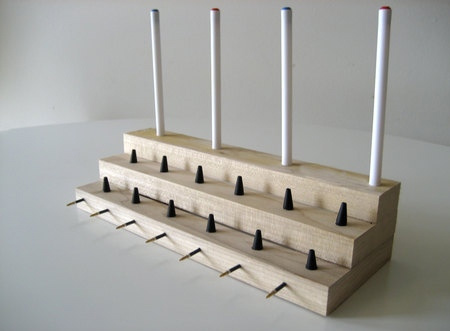
3. On the longest piece (11 1/2 x 4 1/4”) mark 8 evenly spaced holes 1 1/4” apart on the front (thickness) of the wood.
4. Use a drill bit of suitable size, probably around 3 to 4mm, to drill holes in the front edge of the bottom block. This will hold the ink cartridge).
5. In the middle block, drill corresponding holes to a depth of about 5mm to hold the cone-shaped tips.
6. Again, drill corresponding holes to a depth of 5mm in the top block to hold the outer casings of the pens.
7. Stack the wood together, lining up the back edge, and glue the individual blocks together. Clamp, and let dry overnight.
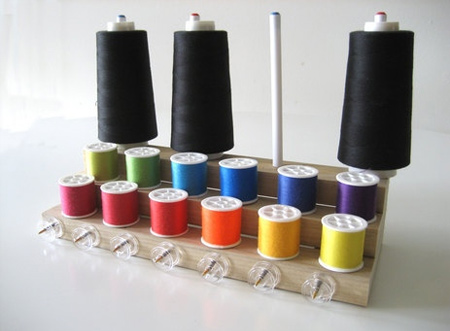
8. Cut the empty ink cartridges to a length of 50mm. Block the ink cartridges with some tissue paper and a dab of glue to prevent any ink flow. Insert these into the holes in the front of the bottom block. These can be used to hold sewing machine bobbins.
9. Dip the cone-shaped tips in glue and insert into the holes of the two middle tiers.
10. Lastly, dip the pen shafts in glue and insert them into the holes of the top tier.
Let the glue dry overnight before using your new sewing kit.
YOU WILL NEED:
10 used plastic ballpoint pens
Offcuts of pine, SupaWood or plywood cut to the desired length for your tool holder
Wood glue
35mm screws
TOOLS:
Drill / Driver plus assorted bits
Countersink bit
Quick clamps
Craft knife
Tape measure and pencil
HERE'S HOW:
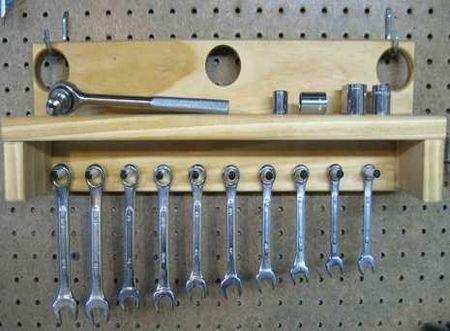
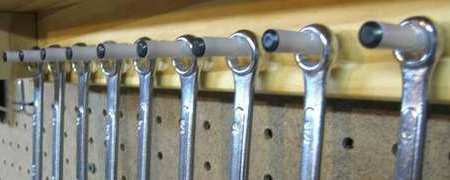
1. Drill evenly spaced holes along the back section to the diameter of the pens you have. Make the holes 10mm deep.
2. Depending on how or where you want to mount the tool holder, add hangers or drill holes. This tool holder will hang on a pin board and has holes drilled in the top back to allow for hanging on hooks.
3. Assemble the shelf using wood glue and screws. Drill pilot holes and countersink for a neat finish. The top back is glued and screwed to the shelf.
4. Insert the bottom shelf (tool holder) and secure through the sides of the shelf with glue and screws.
5. Remove the ink cartridges from the pens. Use a craft knife to cut the outer pen casings down to about 50mm.
6. Dip each casing into glue and then insert them into the holes. Allow to dry.
curbly.com