
How to Conquer Common Bathroom Cleaning Challenges
Using these strategic cleaning methods, homeowners can conquer the most common bathroom cleaning challenges.
03/04/2024
Keeping a bathroom clean can be one of the most difficult cleaning challenges in the home. Bathrooms tend to accumulate grime quickly, and the humidity amplifies issues with mold and mildew. Tackling bathroom messes requires proper techniques and products to get the space sparkling. With strategic cleaning methods, homeowners can conquer the most common bathroom cleaning challenges.
Scrub That Shower
Showers and tubs are some of the grimiest
spots in the home. They are subjected to daily
use, constant moisture, and exposure to dirt,
hair, and skin cells. Over time, soap scum, hard
water deposits, and mildew can make shower walls
and tub surfaces look dingy and feel slimy.
To get showers and tubs looking fresh and
clean, it's important to scrub away built-up
gunk regularly. Use a stiff brush or sponge
along with a cleaner specifically formulated to
cut through soap scum. Apply elbow grease to
remove stubborn stains. Let the cleaner sit for
a few minutes before rinsing to allow it time to
dissolve grime.
For mildew in crevices
and corners, use a toothbrush to scrub away
growth. Clean shower doors by using a glass
cleaner and microfiber cloth. Make sure to
squeegee shower walls after each use and wipe
down the tub after baths to prevent heavy
buildup between deep cleans.
De-Grime the Toilet
Toilets tend to be homeowners' most minor
favorite cleaning tasks. However, regularly
giving the toilet a thorough scrub down can
prevent grime and germs from accumulating. Use a
toilet brush and toilet bowl cleaner to remove
anything sticking inside the bowl. Let the
cleaner sit for 10 minutes before scrubbing and
flushing.
Use an all-purpose cleaner and
microfiber cloth to clean the rest of the
toilet. Spray the cleaner onto the lid, seat,
tank, base, and floor around the toilet. Give
special attention to disinfecting doorknobs and
taps. Wipe any grime away, making sure to get
into crevices.
Use a pumice stone to
scrub the porcelain for hard water stains and
mineral buildup. Add a toilet cleaning tablet to
the tank to prevent dirty rings from forming at
the waterline inside the bowl. The tablets
slowly dissolve with each flush, releasing a
cleaning solution.
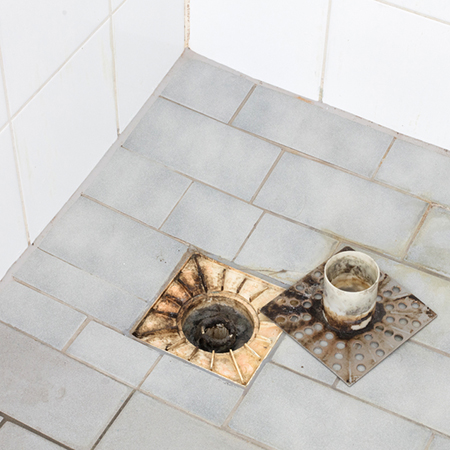
Clear Clogged Drains
Clogged drains are a nuisance that can
quickly lead to dirty, standing water in the tub
or sink. Hair, soap residue, and grime often
accumulate in pipes, causing the drains to run
slowly. With regular cleaning, clogged drains
can be prevented.
For drains with partial
blockages, the first step is trying a plunger.
Place the plunger over the drain and plunge up
and down rapidly several times to try to
dislodge the clog. Follow up by pouring hot
water down the drain. The heat can melt grease
or hair stuck in the pipes.
For drains
that remain clogged after plunging, use a drain
snake. Feed the coil down the pipes while
twisting to hook onto debris. Slowly remove the
snake to pull out the clog. Finish by flushing
the drain with hot water. Prevent future clogs
by using drain catchers and pouring a small
amount of baking soda and vinegar down drains
weekly.
Eliminate Grime On Grout
Grout lines in tiled bathrooms can be magnets
for dirt, grime, mold, and mildew. The porous
nature of grout allows gunk to settle into the
crevices. Mildew growth can flourish in grout
joints with regular heavy moisture in bathrooms.
Restoring dingy, dirty grout requires some
scrubbing. Use a specially formulated grout
brush and cleaner to penetrate and dissolve the
built-up grime. Let the cleaner soak for 5
minutes before scrubbing. For severe mildew
stains, apply a paste of baking soda and
hydrogen peroxide. Allow it to bubble for 10
minutes before scrubbing and rinsing.
Re-sealing grout yearly helps protect it from
accumulating more dirt and stains in the future.
Apply a clear grout sealer and allow it to fully
dry. Buff off any excess once dry. Re-sealed
grout repels moisture and creates a barrier
against grime.

Make Fixtures Shine
Faucets, showerheads, and other bathroom
fixtures can lose their shine over time due to
mineral deposits and soap buildup. Restoring
their luster requires removing the accumulated
gunk. Start by wiping down each fixture with a
wet microfiber cloth.
Use a stainless
steel cleaner and polish with a soft cloth for
stainless steel fixtures. Make a paste with
baking soda and water to remove buildup in
challenging water areas. Gently scrub the paste
onto the fixtures, then rinse. Use a brass
cleaner and buff dry with a clean cloth for
brass fixtures.
To get fixtures fully
gleaming, remove mineral deposits and soap scum.
Make a cleaning solution by adding white vinegar
and dish soap to warm water. Apply the solution
and let it sit for 5-10 minutes before scrubbing
and rinsing. Finish by drying fixtures well with
a towel to prevent water spots.
Deep Clean the Vanity
Bathroom vanities easily collect splatters,
drips, and dust. The toothpaste and makeup
collected on and around the bathroom sink can
make the vanity look dirty. Consider
professional
deep cleaning services for your
vanity for a truly refreshed look.
Here's
what a deep clean typically entails:
- Clear the Clutter: They will remove all items from the countertop, allowing for thorough cleaning.
- Disinfect Surfaces: Using an all-purpose bathroom cleaner, they will wipe down the entire surface, including the faucet, handles, knobs, and backsplash. Special attention will be paid to reaching corners and crevices where grime loves to hide.
- Under-Sink Attention: Everything will be removed from under the sink vanity, and the cabinet will be wiped clean inside and out.
- Stone Care (if applicable): Granite, marble, and other natural stones will be polished with a stone-safe cleaner and sealer (often included in deep cleaning services).
- Removing Stubborn Stains: A razor blade will gently scrape any hardened splatters or residue.
- The Finishing Touch: The countertop will be buffed until fully shiny.
By utilizing professional deep cleaning
services, you can ensure your bathroom vanity
receives the thorough cleaning it deserves,
leaving it sparkling and refreshed.
However, if you prefer to tackle it yourself,
here are the steps involved...
Use an
all-purpose bathroom cleaner to wipe down the
entire surface, including the faucet, handles,
knobs, and backsplash. Be sure to get into
corners and crevices where grime loves to hide.
Remove everything from under the sink vanity and
wipe the cabinet inside and out.
Finally,
polish the countertop with a stone cleaner if
needed. Granite, marble, and other natural
stones will benefit from a specially formulated
stone-safe cleaner and sealer. Use a razor blade
to gently scrape off any hardened splatters or
residue. Buff the countertop until fully shiny.
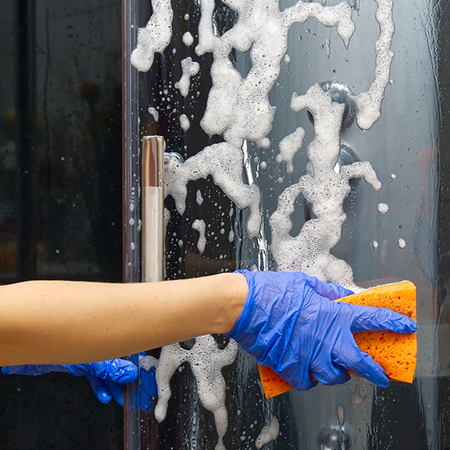
Remove Gloomy Glass Stains
Steamed-up glass shower doors quickly drip
down and leave behind streaks of mineral
deposits, soap scum, and residue. The glass can
soon become dotted with spots, making the shower
look dirty and dreary. Removing built-up stains
restores the glass to a crystal-clean shine.
The first step is thoroughly cleaning the
glass with a squeegee and glass cleaner after
each shower. This prevents heavy buildup from
forming. For existing stains and residues, make
a cleaning paste. Mix some baking soda and lemon
juice or vinegar into a spreadable paste.
Spread the cleaning paste onto the glass
door and let it sit for several minutes. Use a
sponge or soft cloth to gently scrub the paste
over the glass. Rinse thoroughly until all
traces of paste are gone. Finish by squeegeeing
excess water off the glass after cleaning.
Repeat cleaning weekly to prevent new stains.
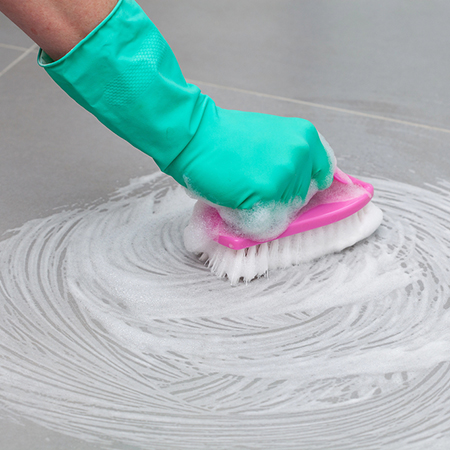
Brighten Bathroom Tile
Tile walls and floors are handsome additions
to bathrooms. But the grout lines easily collect
grime, gunk, and stains over time. Dingy tile
grout makes the whole bathroom look dirty and
unkempt. Thankfully, cleaning and brightening
tile is a doable task.
Start by giving
the tile a de-griming scrub with a stiff brush
and alkaline tile cleaner. The brush's abrasive
scrubbing pads can help loosen residue in the
tile crevices. Let the cleaner soak for 5-10
minutes before scrubbing. Use a toothbrush to
get into tight corners.
For more stubborn
stains like soap scum and hard water marks, make
a paste from baking soda and water. Spread the
paste onto affected tile and grout areas and
allow to sit before scrubbing and rinsing. A
white vinegar rinse can help dissolve any last
traces of buildup.
Sealing grout and tile
every 1-2 years will also prevent grime from
accumulating as quickly. Use a clear tile and
grout sealer to protect surfaces.
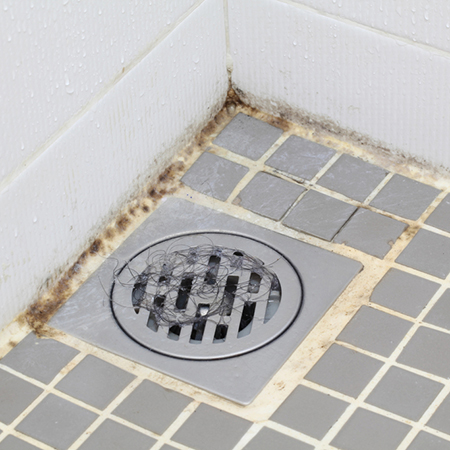
Remove Mold and Mildew
The warm, humid bathroom environment makes
them prone to mold and mildew growth. The spores
land on surfaces like tile grout, walls, vinyl
shower curtains, and baseboards and multiply.
Even well-ventilated bathrooms can develop
sneaky mildew.
Removing mold and mildew
requires killing the spores at the source. Make
a spray solution by adding 1 part bleach or
hydrogen peroxide to 4 parts water. Mist the
solution onto affected areas, and once air-dry,
apply a spray mist of white spirit vinegar to
penetrate deeply and kill the spores entirely.
For rubber or vinyl shower curtains, clean
them by hand in a sink using hot water, vinegar,
and dish soap. Rinse thoroughly and allow it to
dry fully before rehanging. Prevent mildew by
keeping bathroom humidity levels low and
spraying shower walls with vinegar weekly.
Clean any visible mold off walls with
hydrogen peroxide. Repaint stained areas with
mildew-resistant bathroom paint. Ensure showers
and sinks are dried after each use.
Keep Porcelain Pristine
When clean, porcelain sinks, tubs, and
toilets have a beautiful, glossy finish. But
hairspray, soap scum, and mineral deposits in
hard water can leave dull, porous residue on
porcelain surfaces over time. Restoring
porcelain's pristine shine requires dissolving
those layers of grime.
Start using a soft
scrub brush and alkaline bathroom cleaner
formulated explicitly for porcelain. Let the
cleaner soak for several minutes before gently
scrubbing. Avoid abrasive scouring pads that
could scratch the surface.
For hard water
stains and soap scum, make a baking soda paste.
Apply the paste to stained areas and sit for
5-10 minutes before scrubbing and rinsing. The
baking soda's abrasive texture and alkaline
properties help break down buildup. Follow up
with a white vinegar rinse to dissolve any last
bits of residue.
Apply a thin lemon or
mineral oil layer to restore gloss and seal the
porcelain. Buff gently with a soft cloth. The
oil fills in porous scratches and residue spots.
Continue buffing until the surface shines. Seal
tubs and sinks yearly using a porcelain tub and
tile refinishing product.
Daily wiping of
porcelain with a squeegee after showering and
towel-drying sinks after use prevents heavy
buildup between deep cleans.
Sanitize Sponges and Brushes
The tools used to scrub bathroom grime can
collect even more germs. Bacteria like staph and
E. Coli can proliferate on used wet sponges,
cloths, and scrub brushes. Sanitizing cleaning
tools prevents them from becoming grimy
liabilities.
The Centers for Disease
Control and Prevention recommends sanitizing
cleaning tools between uses. Submerge sponges
and scrub brushes in a bleach solution
containing 3/4 cup bleach diluted in 1 gallon of
water. Allow them to soak for 5 minutes before
rinsing thoroughly.
For a greener
sanitizing method, submerge tools in undiluted
white vinegar for 10 minutes. The naturally
antibacterial vinegar kills 99% of bacteria.
Rinse the tools well before using them again.
Microwaving damp sponges for 60 seconds can also
kill germs between uses.
Allow brushes
and sponges to fully air dry before storing to
prevent mildew growth. Wash microfiber cloths in
hot water between uses and replace them every
3-6 months.

Banish Bathroom Odors
Even a sparkling, clean bathroom can suffer
from foul odors. Sinks and drains are prone to
developing smells from built-up grime. Mold and
mildew can cause musty stenches. Toilets can
hold onto odors even after flushing. Tackling
bathroom odors requires neutralizing and
eliminating the source.
For drains, pour
a mix of baking soda and vinegar down the drain
weekly. The fizzy reaction helps dislodge gunk,
while the vinegar kills bacteria. Follow up by
running hot water for a full minute to
rinse—place drain catchers to prevent hair and
debris from accumulating.
Clean all
visible mildew with hydrogen peroxide or
chlorine bleach to kill spores and stop musty
smells. Increase ventilation and run an exhaust
fan for 20 minutes after showering—place bowls
of vinegar around the bathroom to absorb odors
from the air.
To freshen toilets, flush
with the lid closed since flushing sprays
bacteria into the air. Clean all surfaces
thoroughly, including under the lid. Drop toilet
deodorizing tablets into the tank. They slowly
dissolve with each flush.
Conclusion
While heavy-duty deep cleaning sessions are
needed to tackle built-up grime, staying on top
of simple tasks is crucial. Daily surface
wiping, weekly tub and shower scrubbing, and
consistent use of drain catchers help prevent
messes before they start. Establishing these
habits makes cleaning feel more manageable.
Cleaning bathrooms does not have to be an
arduous chore. With the right tools and
techniques, homeowners can win the battle
against soap scum, hard water stains, mold, and
mildew. A sparkling, clean bathroom provides a
peaceful oasis from busy days. Adopting
effective cleaning methods to conquer dirt,
odors, and grime allows anyone to become a
grime-fighting champion.