
Replace a bathroom basin
You don't have to live with ugly fittings when they are so easy to replace. Simply pull out and remove the old hand basin to install a new, modern hand basin to update a bathroom.
Step 1
To turn off the cold water: you may have isolator valves fitted to the hot and cold supply pipes underneath the sink. These mean that you can turn off the water to just the sink and not the entire system. If not, you will have to turn off the cold water at the main stopcock.
Step 2
To stop the flow of cold water turn on the cold taps until the water stops running. If you can't find the stopcock, turn off the main water valve under the cover in the street or front garden. You’ll need a special long-handled spanner, available from plumbers' merchants or builder's hardware store.
To turn off the hot water: always turn off the geyser at the main switch before draining the hot water. Turn off the valve on the cold feed pipe to your cylinder and run the hot taps to get rid of water in the pipes. Turn on all the cold water taps in the bathroom to empty the tank. When no more water comes out, run the hot taps until these run dry as well.
Step 3
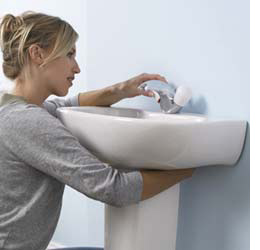
If you are re-using old taps, use adjustable wrenches to remove them from the old sink. If you're lucky, you may be able to connect the water supply pipes and waste directly back to the sink trap and the taps. If not, or for new taps, fit flexible tap connector pipes and waste pipe parts to make the connections. Use the washers and gaskets supplied to give a watertight seal around the new taps.
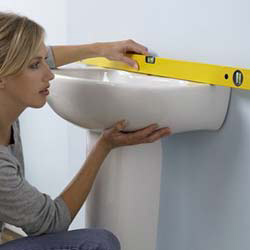
Step 4
Use a spirit level to check the new sink is level.
Step 5
Connect the overflow to the waste pipe with the parts supplied. Place the sink into the worktop or screw to the wall and double check all the pipes can be easily connected. Make sure the flexible tap connector pipes aren't stretched or kinked.

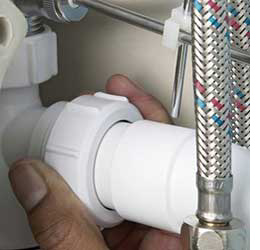
Step 6
Seal around the lip of the unit with silicone. It is much easier to buy a large tube and a gun to apply and any left over will always come in handy around the home. Use two adjustable spanners to tighten the joints on the flexible tap connectors. Try to fit as many parts to the new sink as possible before fitting to the worktop or wall, so that you just have to make one connection under the sink when it's in place.
GOOD TO KNOW: If your new worktop sink isn’t exactly the same size as the old one, you’ll need to use a jigsaw to enlarge the cut-out on the worktop. Use the template provided to mark the area to be cut. Remember not to cut around the edge of the sink – check the instructions so that the rim sits on the worktop.